ReadySet

Product design for VR retail planning and research software

ReadySet software shown on laptop

Overview

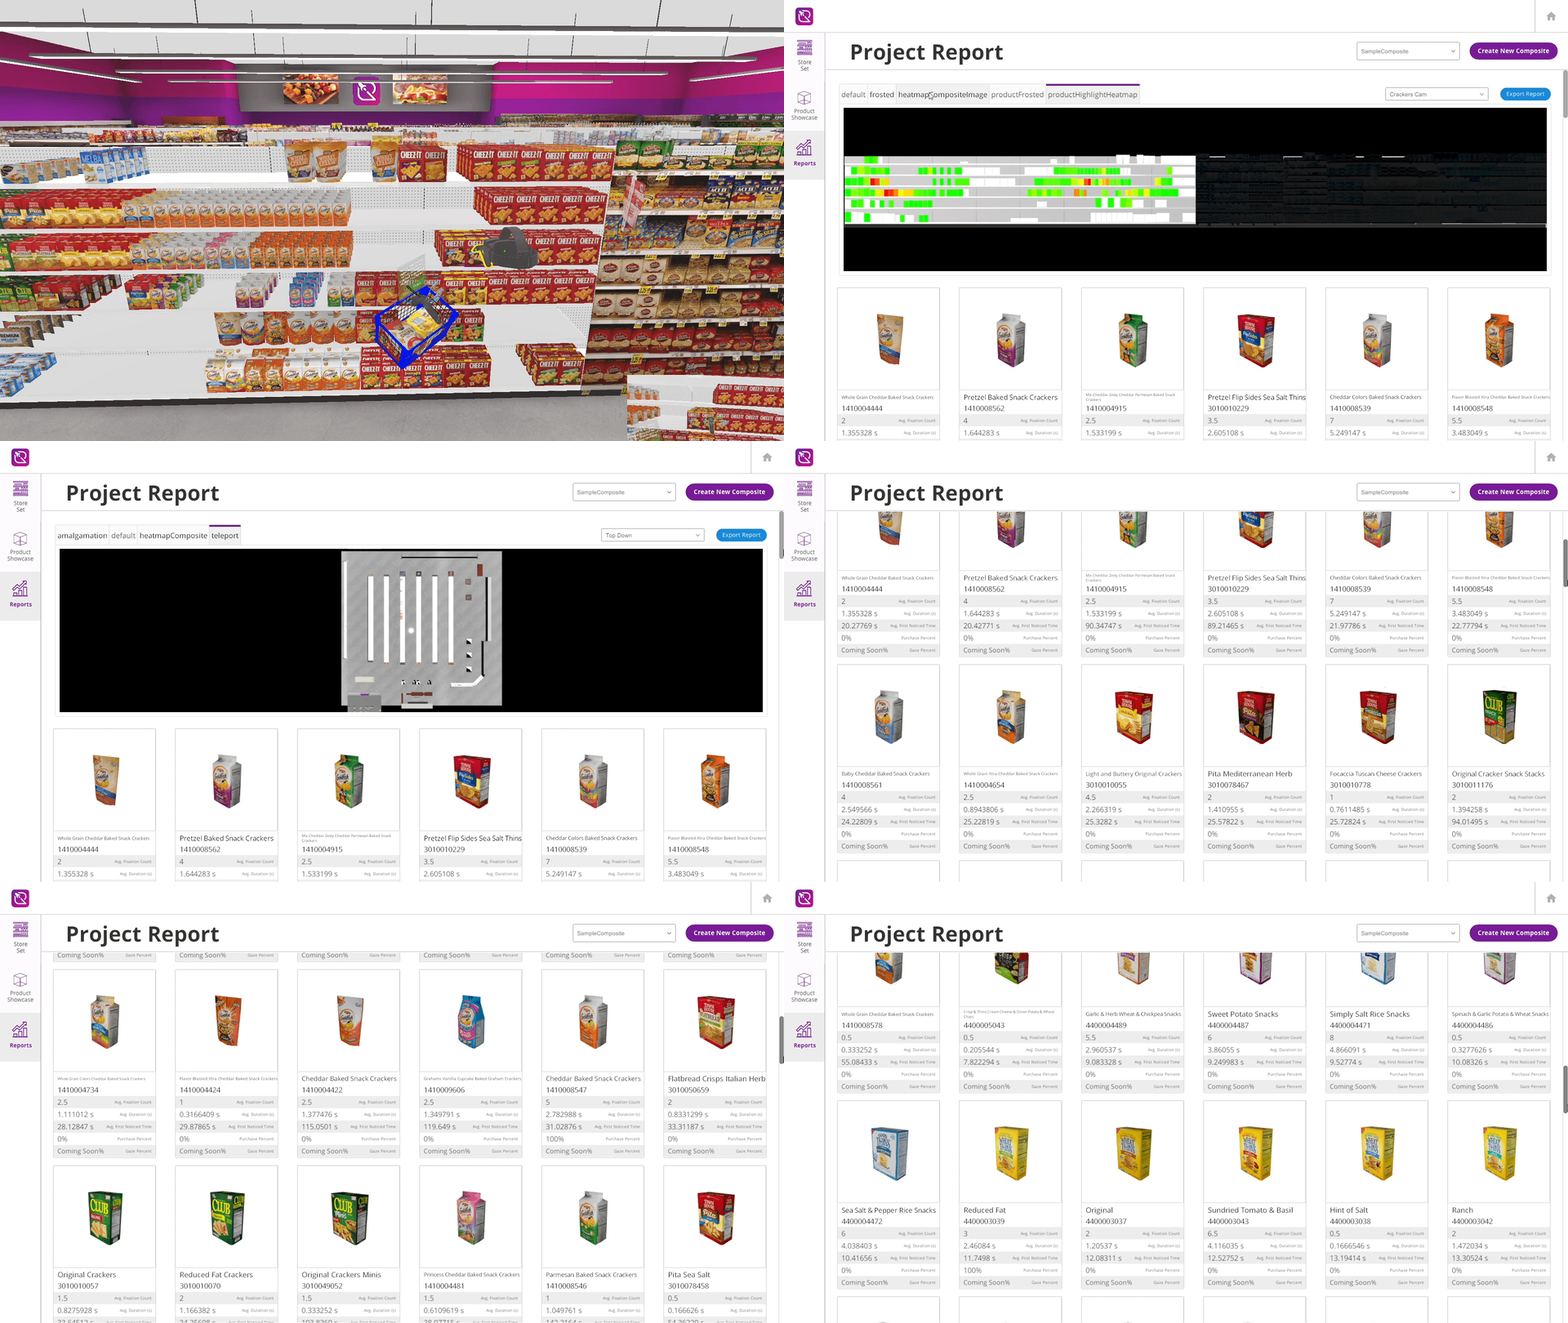
ReadySet enables product manufacturers, retailers and researchers to planogram in virtual reality (VR) retail environments. This helps them expedite the retail innovation process by saving space, time and money.

The goal of this project was to launch a Minimum Viable Product (MVP) on a six-month timeline.

Outcome

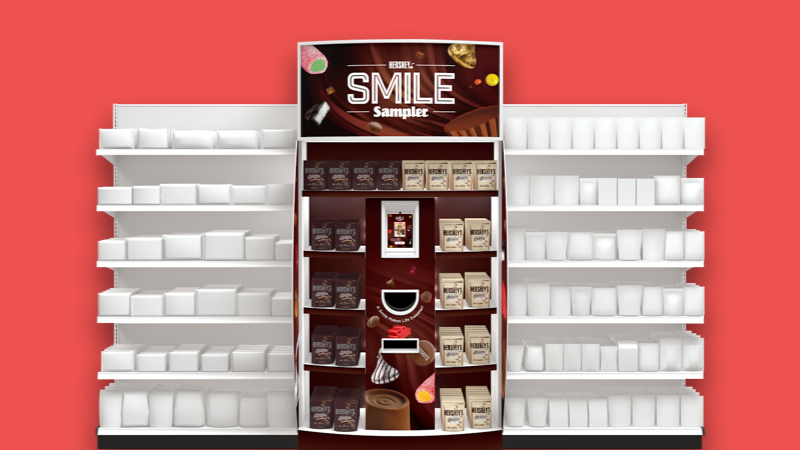
The MVP was successfully launched within the 6 month timeframe and was evaluated at 9 million dollars. Shortly after launch, it was purchased and adopted by two enterprise level clients, General Mill and The Hershey’s Company. It also successfully raised A round venture capital funding to conintue to grow and improve the prodcut.

Client

ReadySet

Platform

Windows

Timeline

6 months

My Role

I lead and managed the design of this project as part of an in-house team. The team was made up of ten individuals, including two stakeholders, three software developers, two 3D modelers, a visual designer ,a project manager, and myself, as the product designer.

To guarantee business goals were prioritized, I worked closely with the stakeholders. I collaborated with the software developers and 3D modelers to take technical limitations into consideration, and to ensure the product was feasible. I also implemented the logo and brand that was developed by the visual designer.

Responsibilities

  • User Research
  • User Expirence Design
  • User Interface Design
  • User Testing

Problem

Product manufacturers and retailers are under immense pressure to deliver innovative in-store solutions to keep pace with evolving shopper preferences, and they’re being asked to do it faster, with lower budgets, with fewer resources, and with inefficient tools.

The bloated, slow, and costly store planning tools and processes make meeting goals increasingly difficult. We were tasked with creating a product that would save time, money, and space while delivering innovative retail solutions.

Process

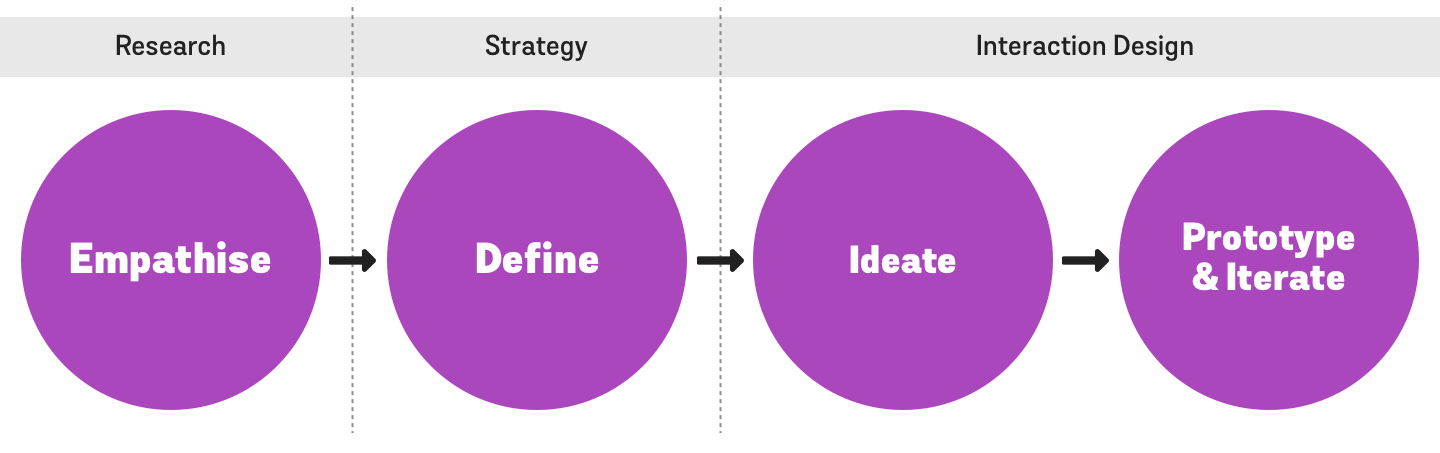
The problems presented with this endeavor were complex, so I used a design thinking process to help define and understand the human needs behind the project. I also took a irritative, hands-on approach to prototyping and testing.

ReadySet design process diagram

Emphasize

In order to develop a deeper understanding of the retail innovation industry, and to better identify with the end users, I conducted user research and developed user profiles.

User Research

User research was essential in order to translate users’ goals and pain points into features.

Primary Research

I conducted qualitative interviews with individuals who design, test, and implement innovation retail solutions. I spoke with a Category Manager, Technology Manager, and Market Research Manager to better understand their needs.

In my research I sought to:

  • Understand their current role and responsibilities
  • Learn about their day to day retail innovation tasks
  • Review tools and software they use
  • Learn how their roles apply to the retail innovation process

Secondary Research

I gathered information through online research and speaking with the stakeholders, to gain knowledge of the industry, and to better understand the strategies and processes used in retail innovation.

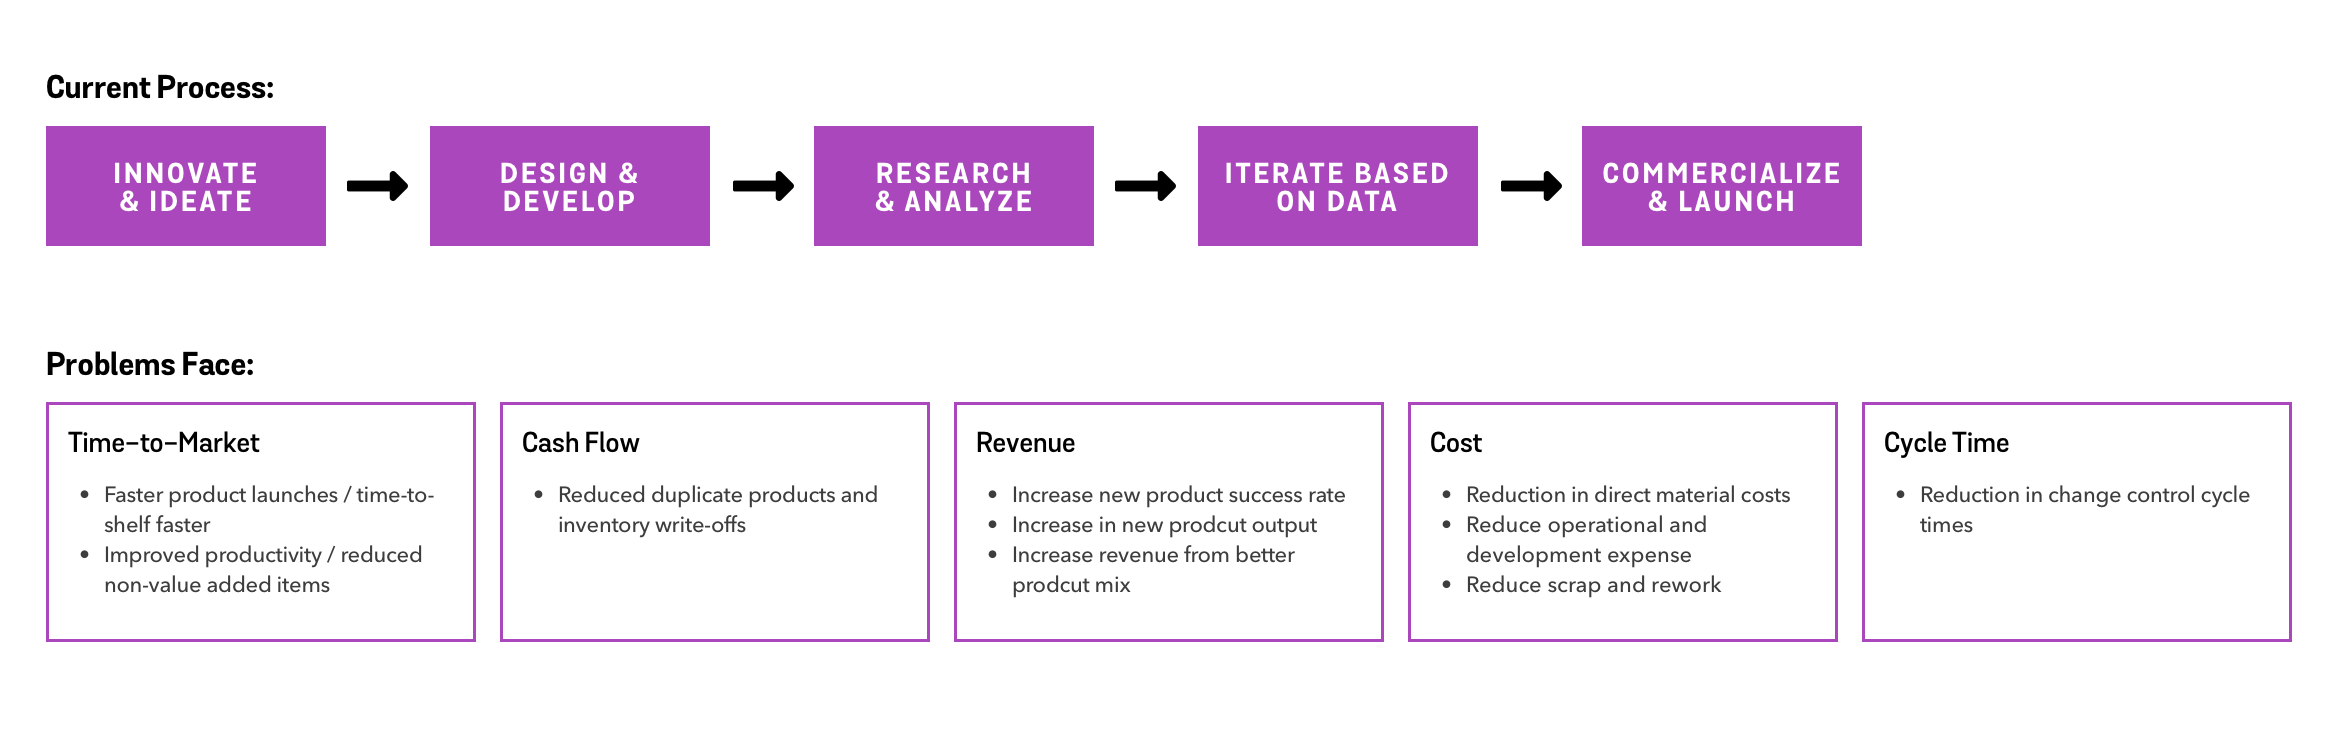
Retail Innovation Project Life Cycle
I created a map of a general Retail Innovation Project Life Cycle. I was then able to compile a list of pain points and problems that are often part of the process.

Retail Innovation Project Life Cycle Diagram

Retail Innovation Project Life Cycle Diagram - Zoom In

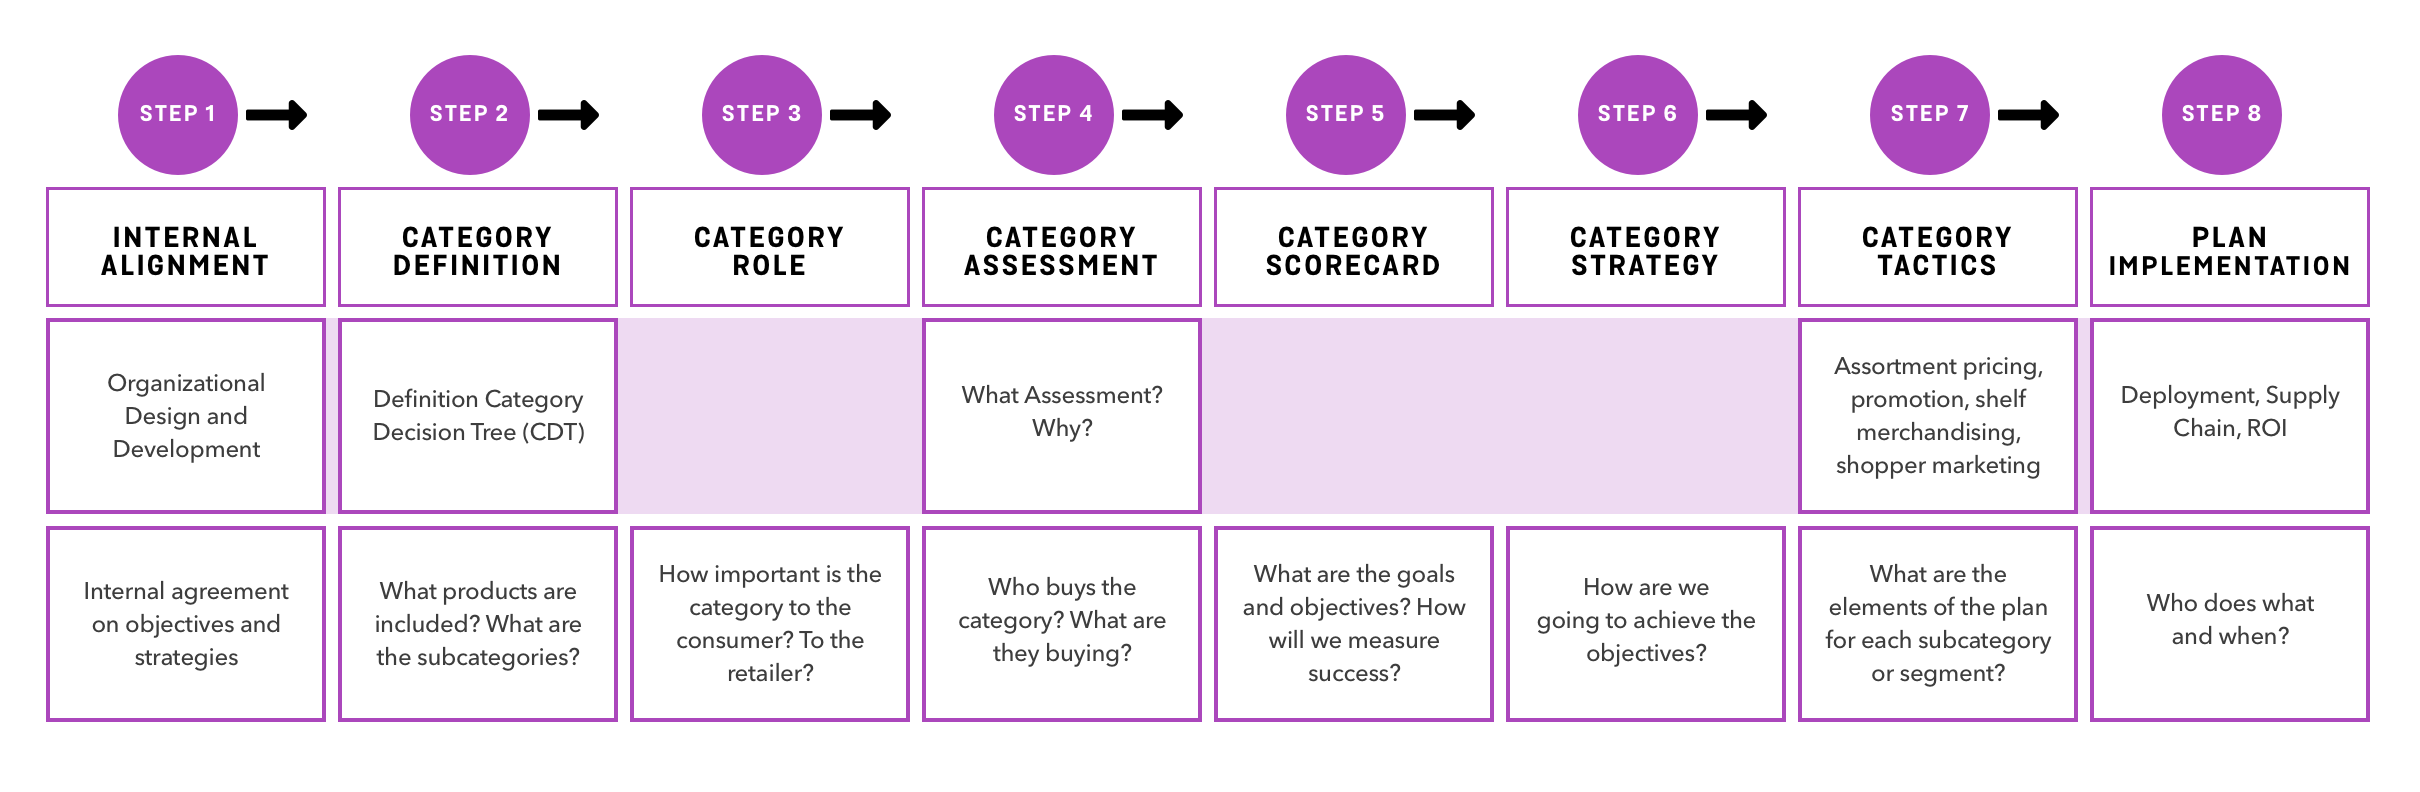
Category Management Process
Establishing a proper assortment of products in the proper location is an essential objective in retail innovation and sales. My research into the Category Management Process allowed our team to distinguish how ReadySet could fit into, and improve, this process.

Category Management Process Diagram

Category Management Process Diagram - Zoom In

User Profiles

The qualitative interviews illustrated how users with varying jobs would use the product differently. To cater to this, I developed user profiles that defined their roles and listed tasks and goals that ReadySet could potentially help them with. These profiles provided direction in which features the team would include in the product.

Catagory Managers/Catman

Role

Category Management is the primary platform from which product brand owners interact with retailers.

Objectives
  • Change category adjacencies to determine what appeals to the most shoppers
  • Understand how out-of-stocks influence total category sales
  • Create innovative store flow and aisle design concepts
  • Visualize concepts and collaborate with category partners
  • Understand shifting between brands and how it impacts profitability when new arrangements are introduced
Goal

Encourage stakeholders to see beyond data, and to act on innovation.

Sales Director

Role

Sales Directors are responsible for managing and enriching account relationships within a defined territory.

Objectives
  • Motivate internal teams to take new concepts into market
  • Showcase compelling innovation ideas at sales meetings, tradeshows, and conferences
  • Drive adoption and collaboration with key clients

Goal

Get retail customers to sign-off more quickly on my proposed growth plans.

Consumer Shopper and Insights Manager

Consumer insight managers primarily work in market research, seeking to discover target areas that drive the operational and creative strategies within a company.

Objectives

  • Conduct virtual shopper studies that span various geographies and demographics
  • Discover the best in-store placement for new products and marketing displays
  • Evaluate planogram arrangements to ensure a product sells
  • Determine how new packaging will impact sales
  • Evaluate the impact of brand advertising on product recognition and purchases
  • Gain insight into not only what shoppers buy, but why they buy it

Goal

Make my shopper data able to better fit my budget, timeline and purpose.

Store Innovation Manager

Role

A store innovation manager’s responsibilities focus on the development of new products, services, or processes to help an organization succeed.

Objectives

  • Conceive and create new in-store marketing concepts in a lifelike format
  • Test innovative ideas to influence shopper decisions at point of sale
  • Create concepts to implement in-store marketing ideas in the real world
  • Test the impact of new packaging on sales in different retail formats
  • Measure brand recognition and awareness in a realistic store simulation
  • Collaborate seamlessly in real-time with agencies and internal teams

Goal

Foreseeing future shopping preferences.

Define

We had a limited amount of time before the product launch, so in order to expedite decisions on the core product features, I generated a competitive analysis, and held a feature prioritization workshop.

Competitive Analysis

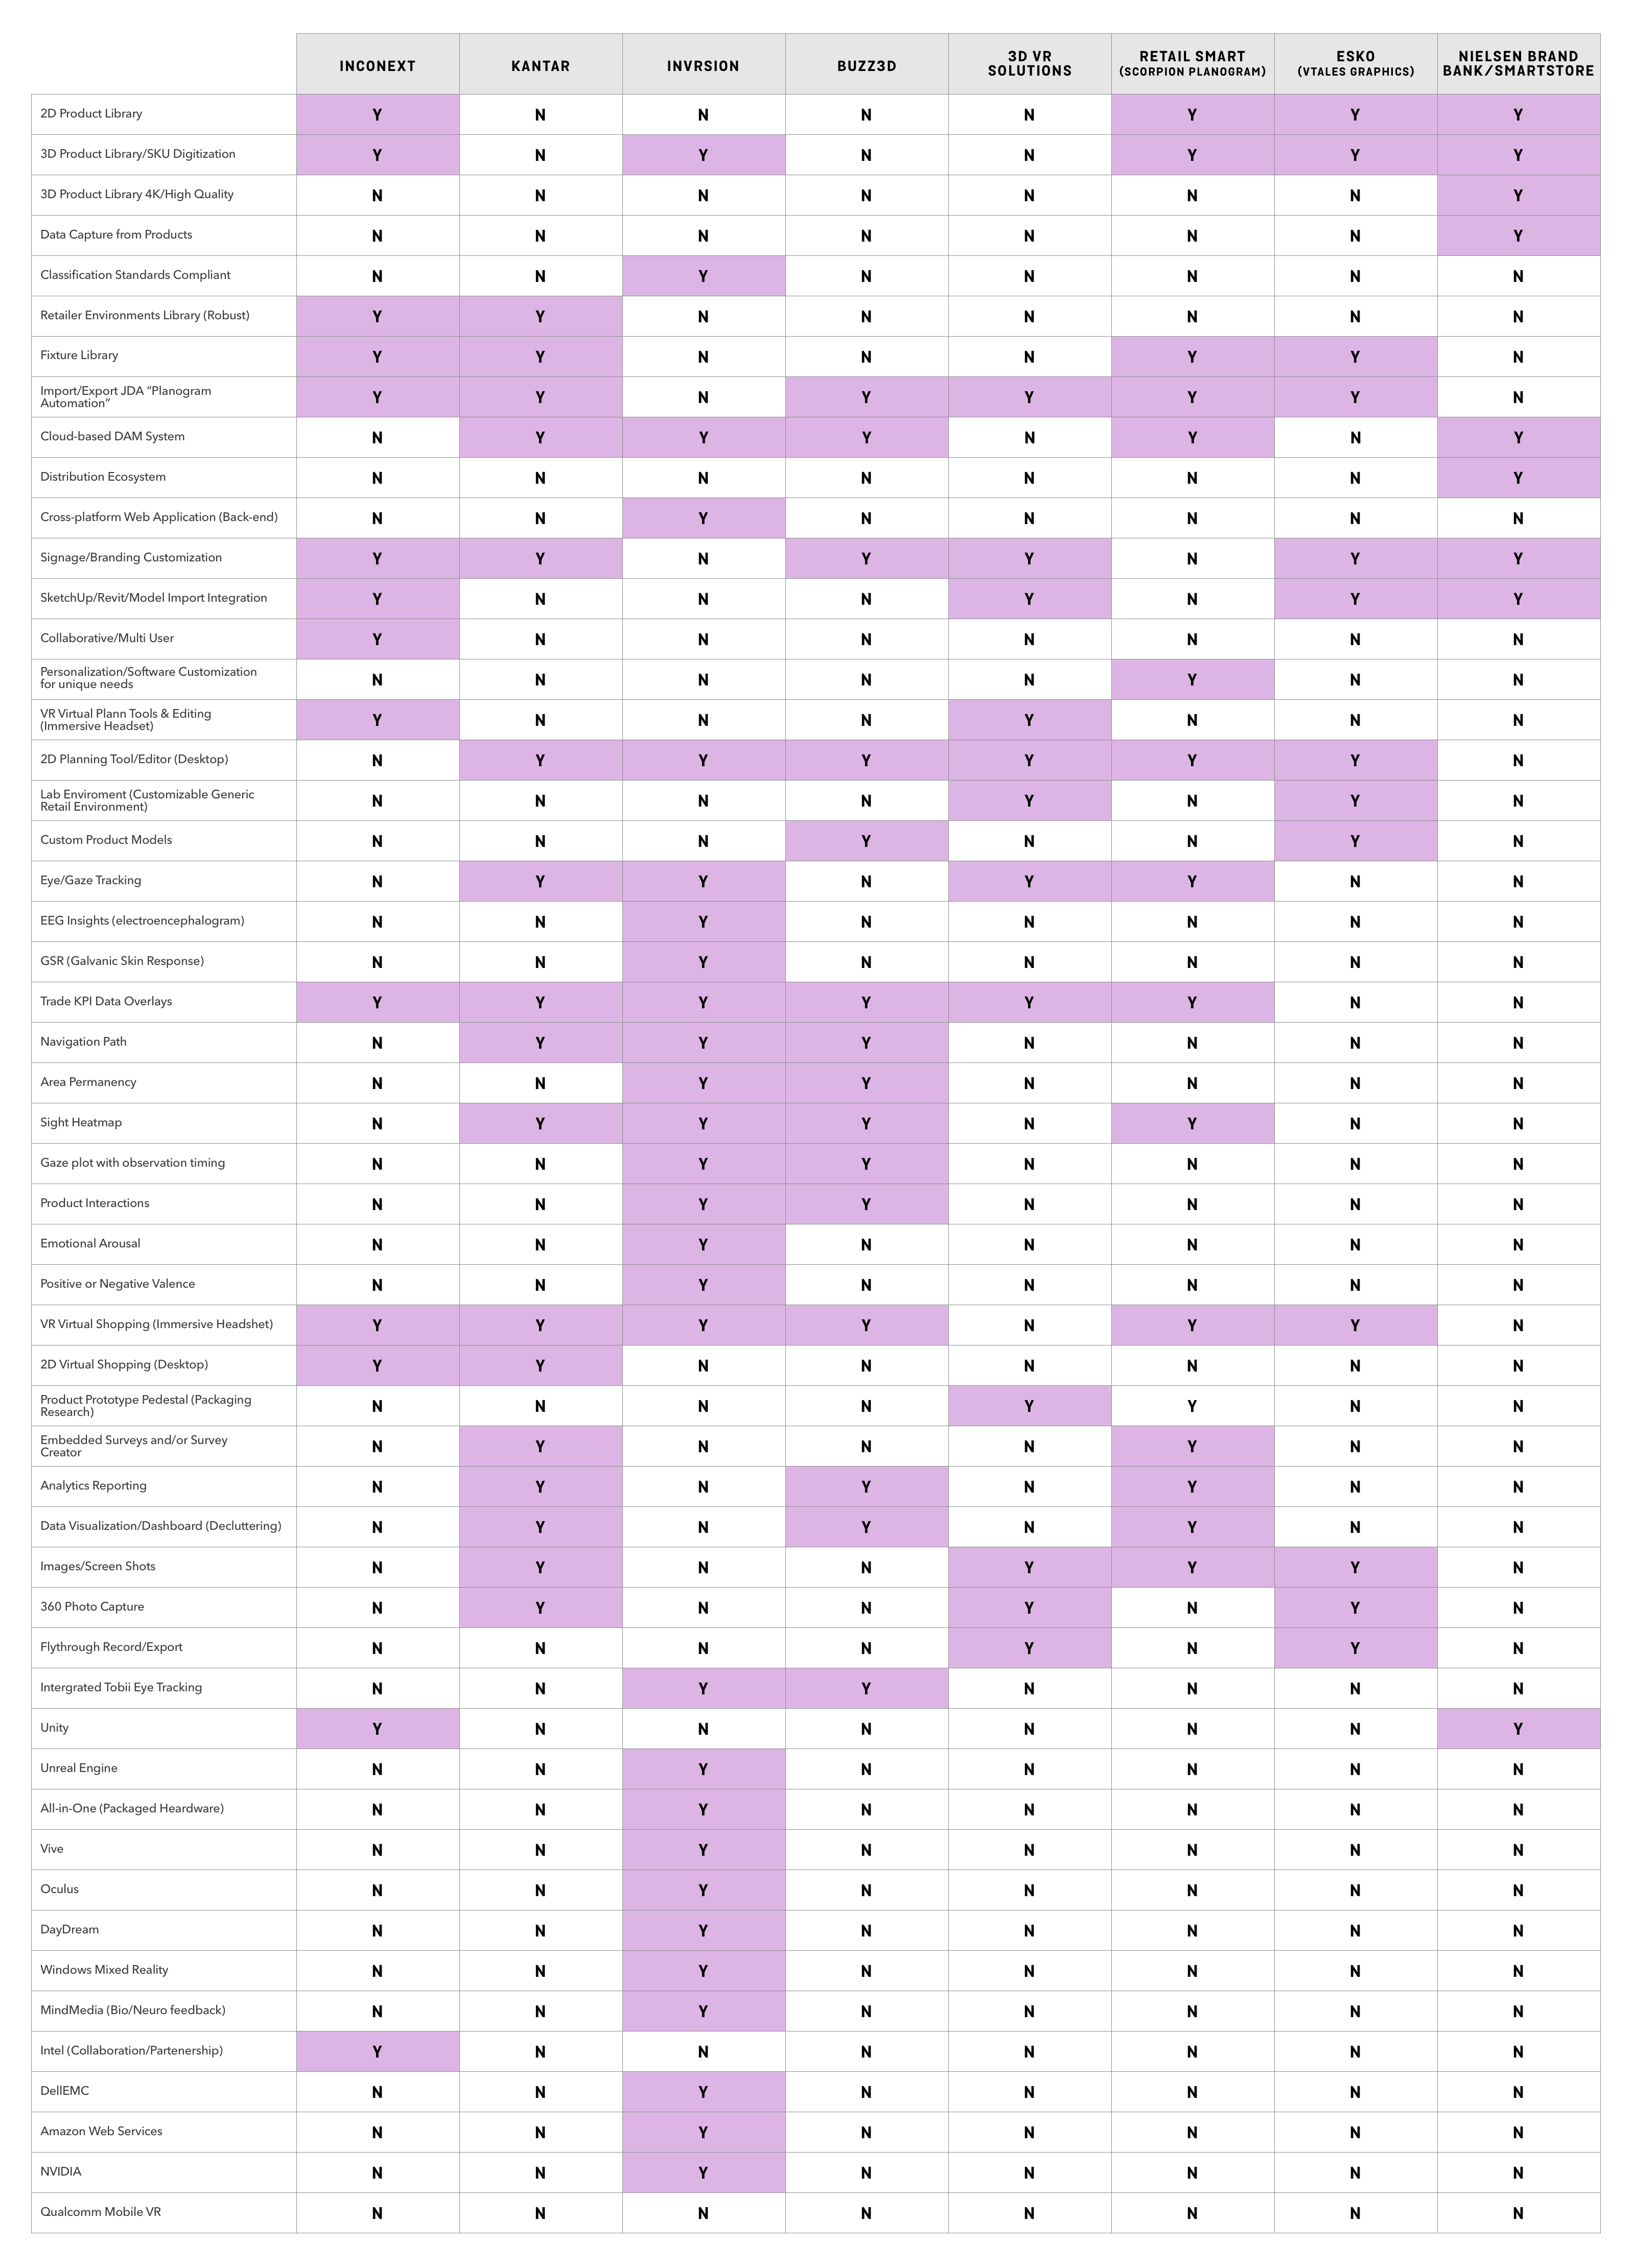
I performed a competitive analysis to ascertain what the field of competitors products was like. This allowed us to find a competitive advantage by differentiating our product from theirs.

Competitve Analysis

ReadySet competitive analysis chart - zoom in

Feature Prioritization

Determining which features to include in the MVP, and which to exclude, was critical to launching the product on time. In order to come to a consensus amongst the team, I held a feature prioritization workshop.

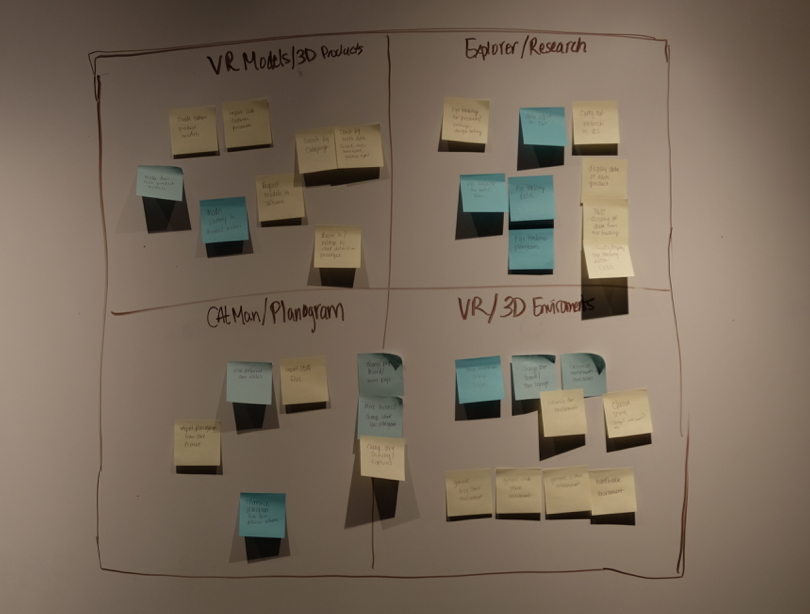
Whiteboard Catagorize Features

Photo: Whiteboard Catagorize Features

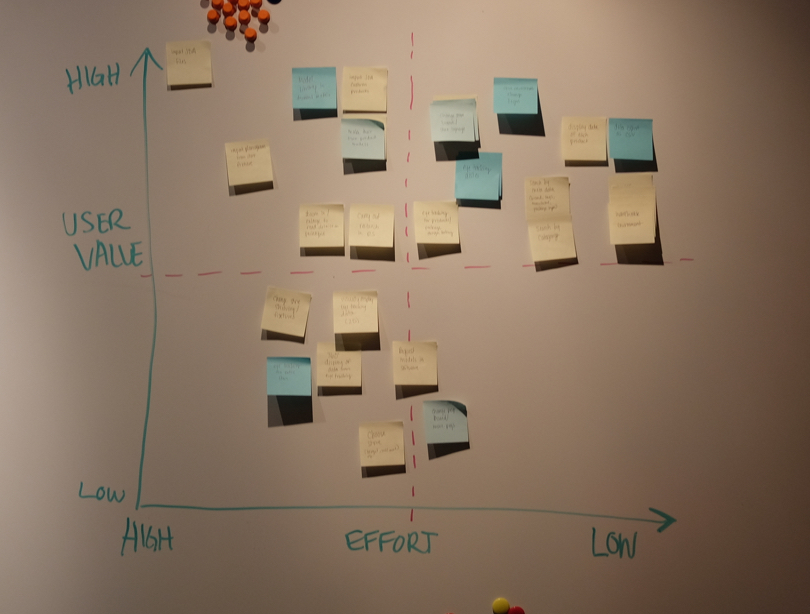
Whiteboard Impact/Effort Matrix

Photo: Whiteboard Impact/Effort Matrix

Before we dove into prioritizing individual features, we broke them up into smaller categorizes. This helped us avoid choice paralysis and made sure we were working on the types of features that are most important for launching the MVP.

After the features were more or less mapped out and categorized, it was time to pick which ones are most important and needed to be implemented into the MVP and which ones could be implemented later. To do this, we plotted the features on an Effort/Impact matrix as a team with sticky notes. A Effort/Impact matrix matrix is a 2D-visual that shows the relative importance of a set of items based on two weighted criteria This helped the team define what features would have the highest impact with the lowest effort.

Store Environments

Prioritized
  • Baseline generic C-store, large format, and warehouse store environments
  • Customizable color, logos, and signage in retail environments
Bumped
  • Specifically branded retail environments

Planograming

Prioritized
  • Load planograms directly from JDA
  • Planogram within the VR environment, anywhere in the store
Bumped
  • Customizable fixtures and shelving
  • Customizable storesets

Product Models

Prioritized
  • High-resolution 3D products (4K)
  • Streamlined cloud-based library
Bumped
  • Request missing product models within the app

Research & Analytics

Prioritized
  • Fully-integrated eye tracking
  • Analytics & visual report output
Bumped
  • Whole store eye tracking

Ideate

Once the features were clearly prioritized, I worked closely with the software developers and 3D modelers to determine how to deliver them within the product.

VR Retail Environment Creation

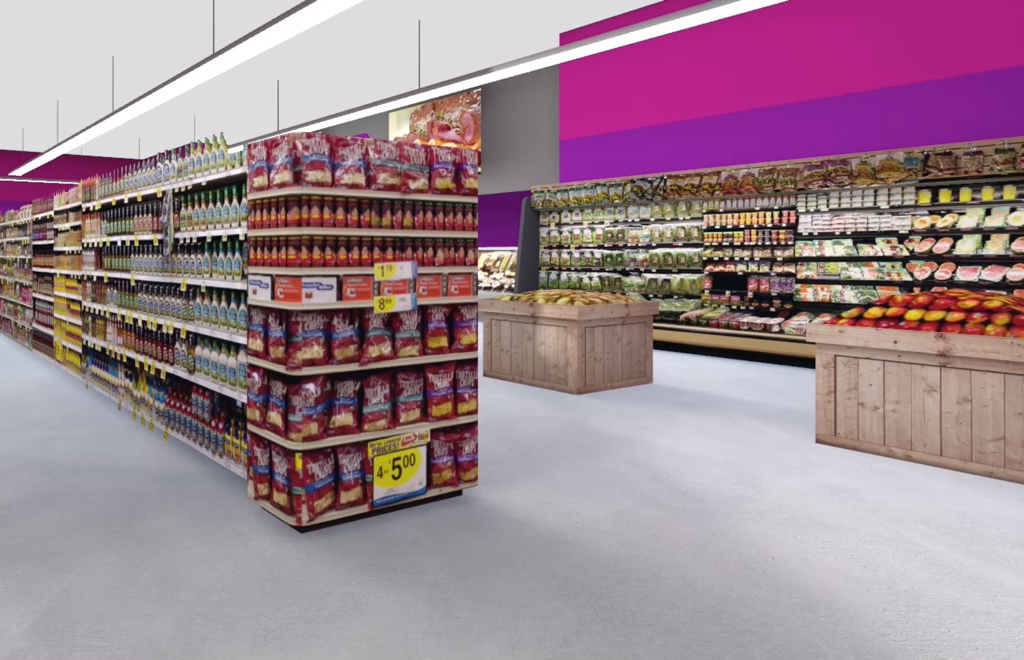
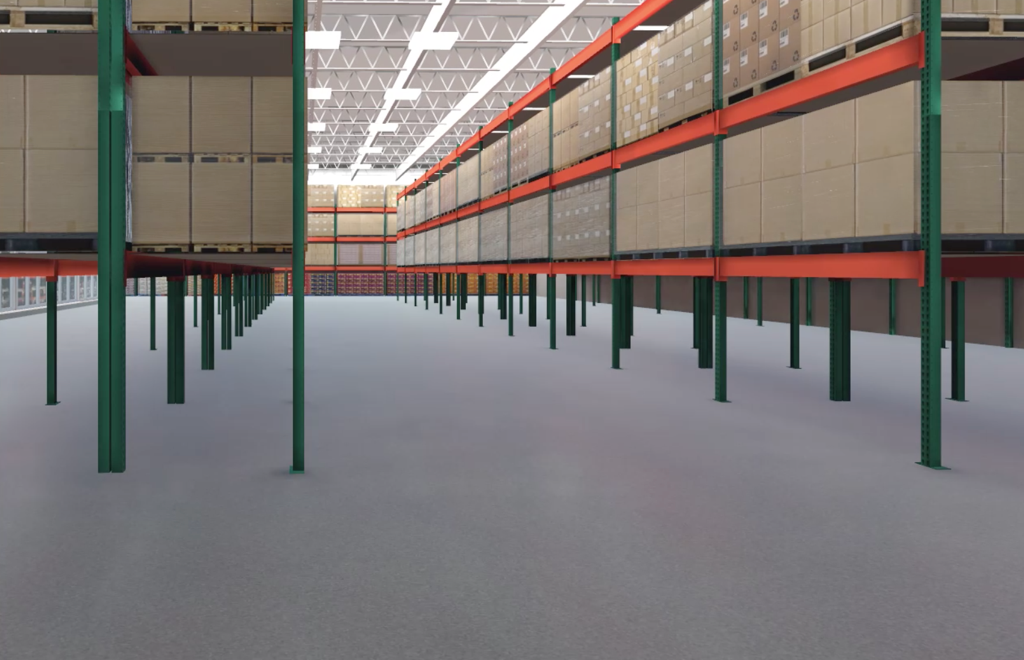
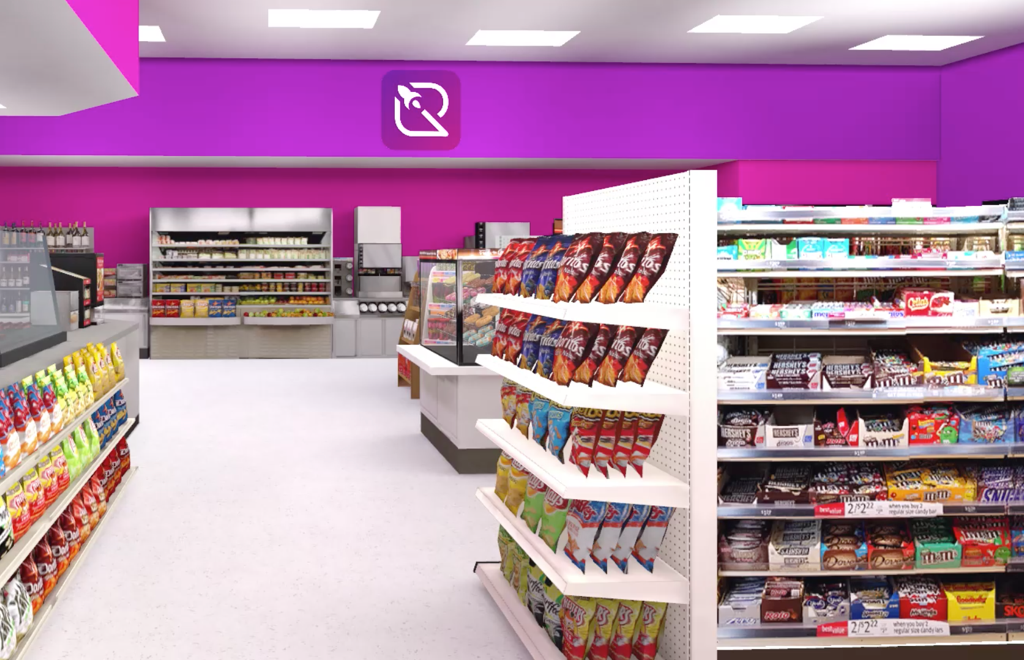
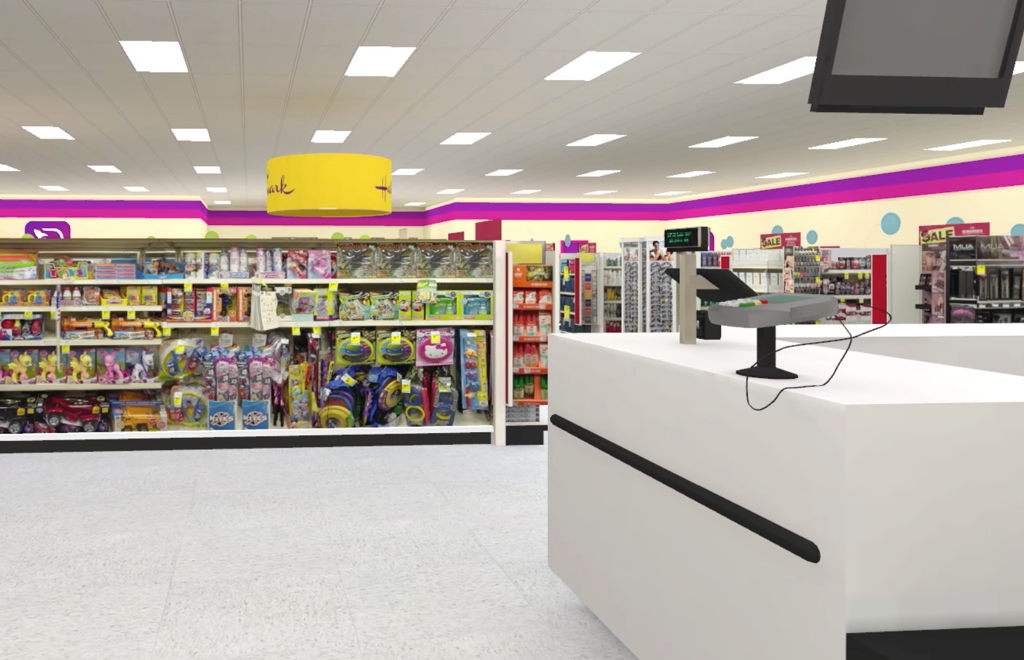
The 3D modelers took the lead on creating the retail environment that would be used within the VR environments.

Modeled Retail Environments

  • VR Retail Environment of grocery store
  • VR Retail Environment of club store
  • VR Retail Environment of convenient store
  • VR Retail Environment of drug store

User Flow

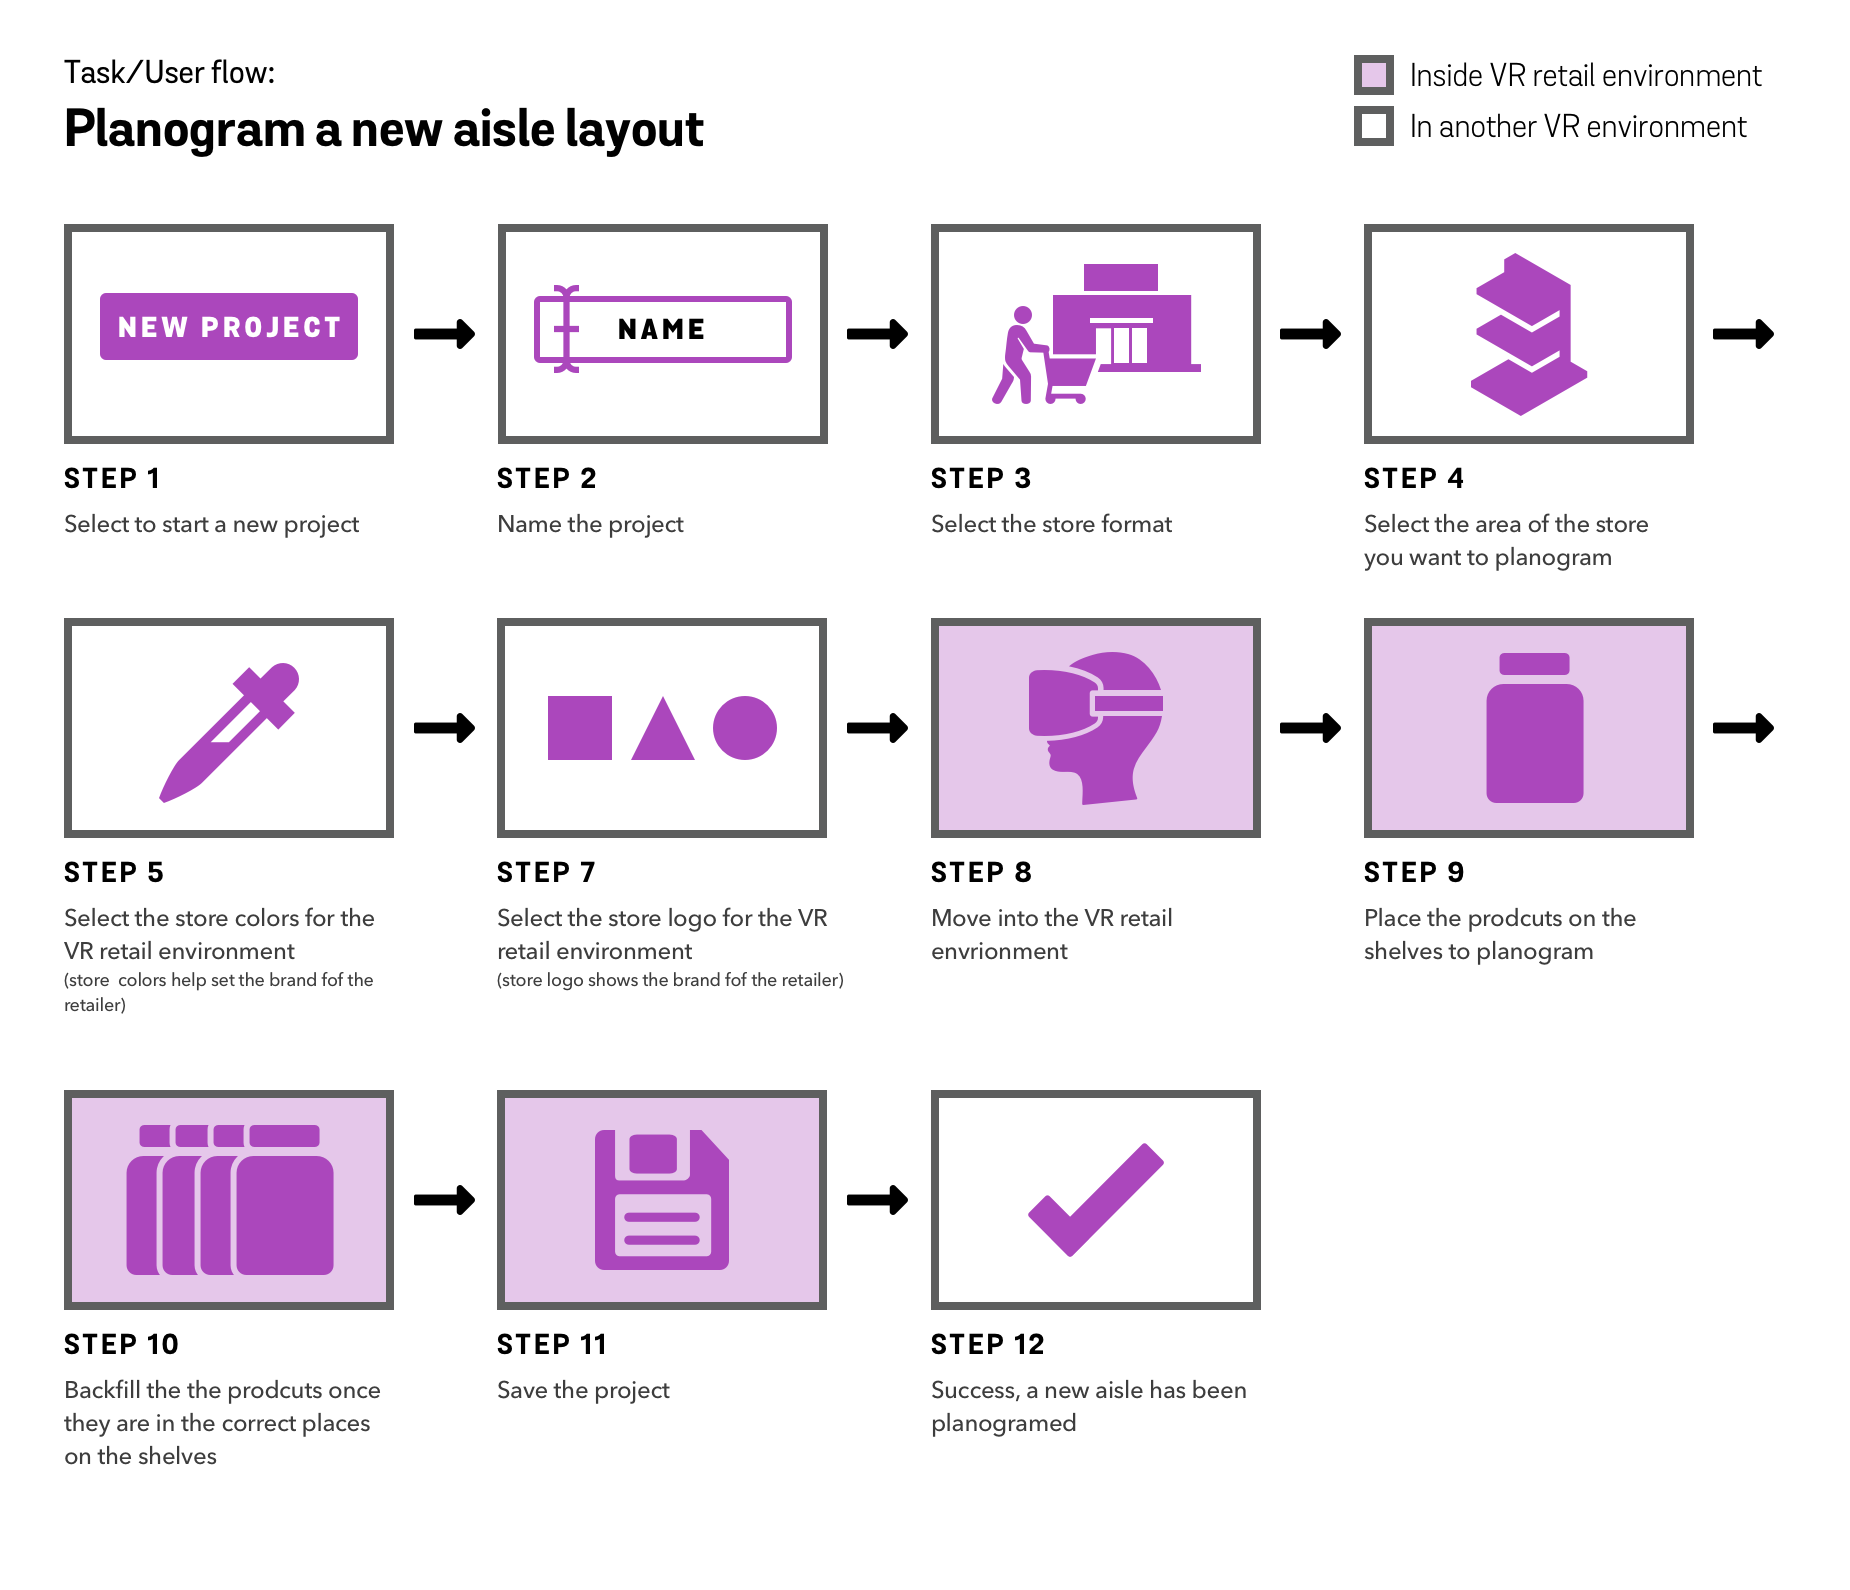
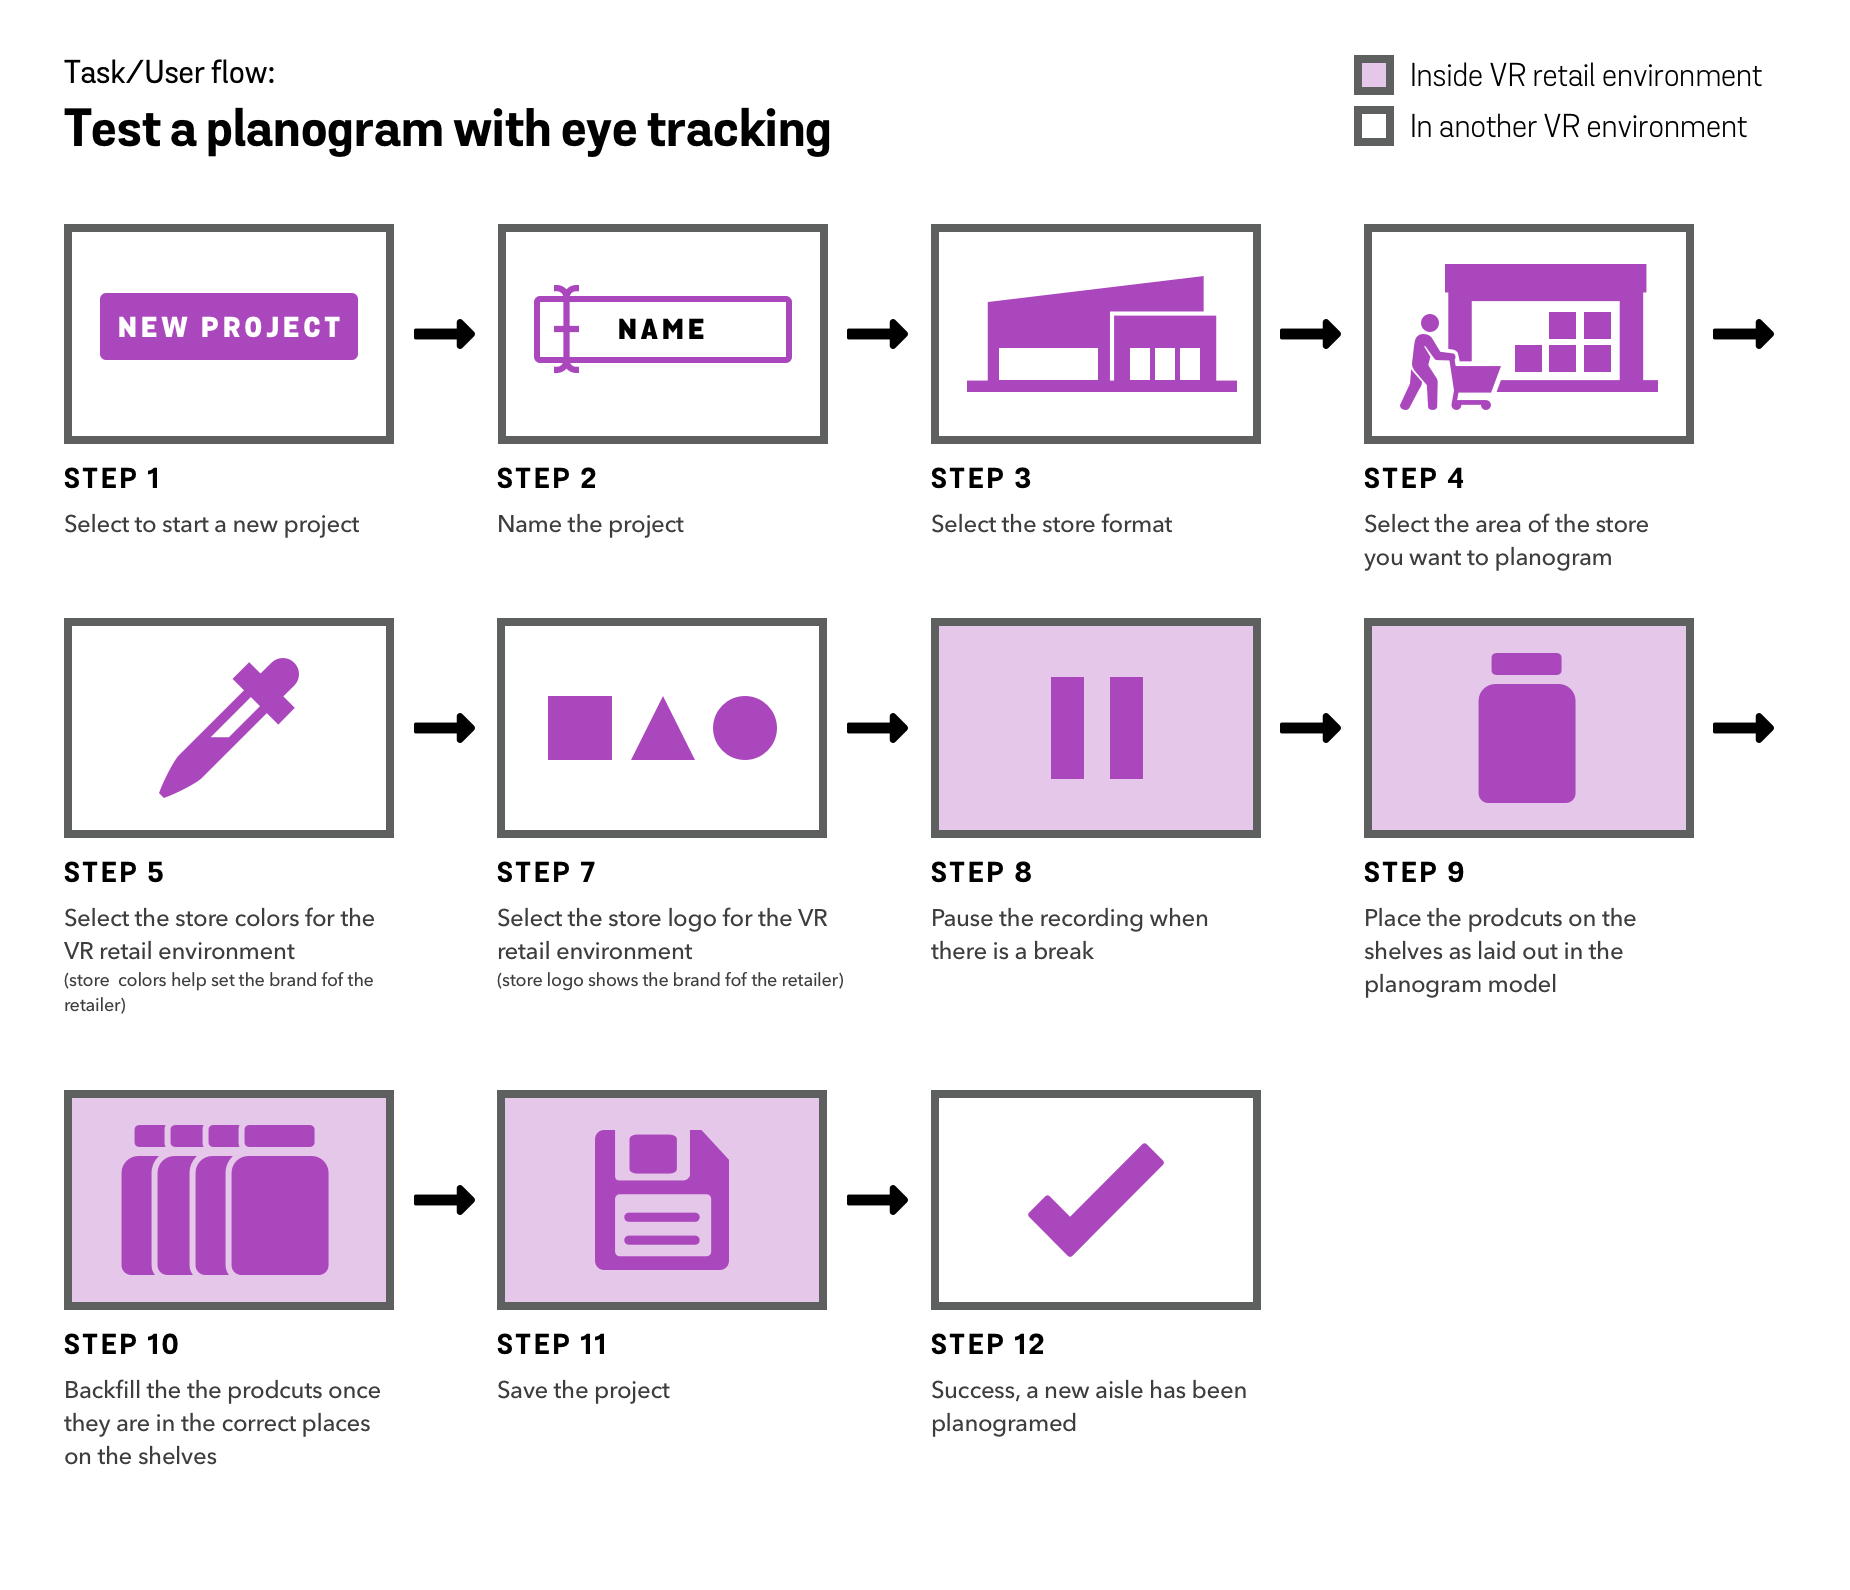
I created User Flows to visualize complex processes before we began to build the product. User flows illustrate the path a user follows to complete important, key tasks in the application.

Planogram a new aisle layout
This diagram shows the steps a user would take to program an aisle

Planogram a new aisle layout Diagram

Planogram a new aisle layout Diagram - Zoom In

Test a planogram with eye tracking
This diagram shows the steps a user would take to collect eye tracking data, to test the planogram of an aisle

Planogram a new aisle layout Diagram

Test a planogram with eye tracking Diagram - Zoom In

VR Retail Environment Interactions

The software developers took the lead on developing the interactions that would take place in the VR retail environments. I collaborated with them to make sure the interactions were as usable and intuitive as possible.

Early phase of testing and developing VR interactions

Photo: Early phase of testing and developing VR interactions

Testing and developing VR interactions

Photo: Testing and developing VR interactions

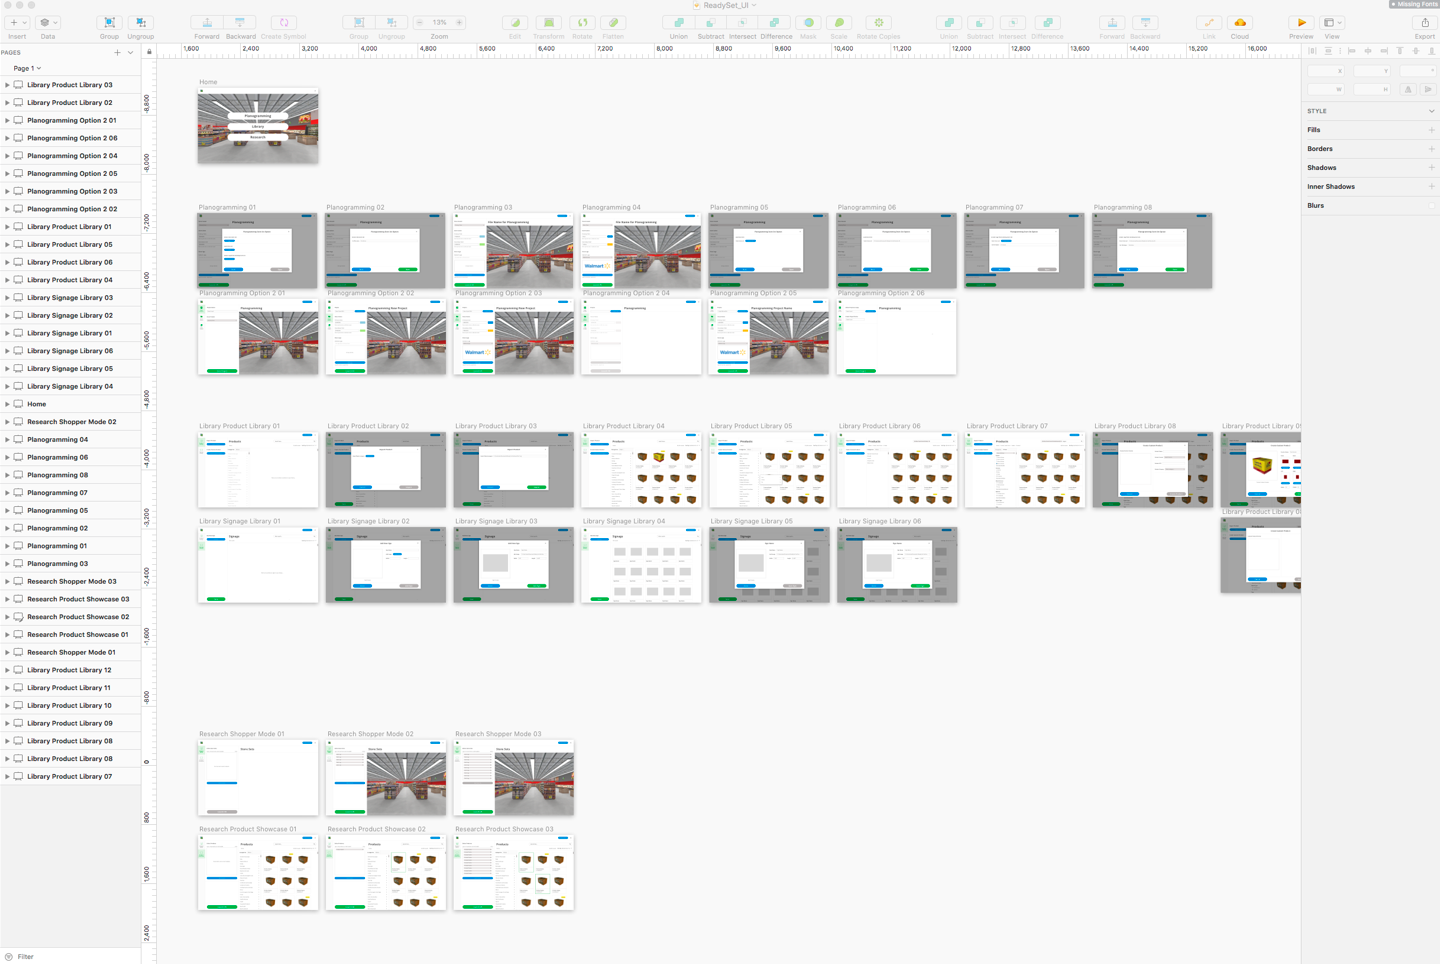
ReadySet UI design sketches and wireframes

Prototype, Test & Iterate

The team implemented an iterative prototyping and testing process in the development of this MVP. This process made sure the product remained usable, as well as technically feasible, as we worked to find a successful solution.

First Iteration

In the earliest iteration of the product, all of the features were designed within the VR environment. This required the use of the Vive VR headset.

I worked closely with the software developers and 3D modelers to develop a viable solution for planogramming and visualizing eye-tracking in the retail environment.

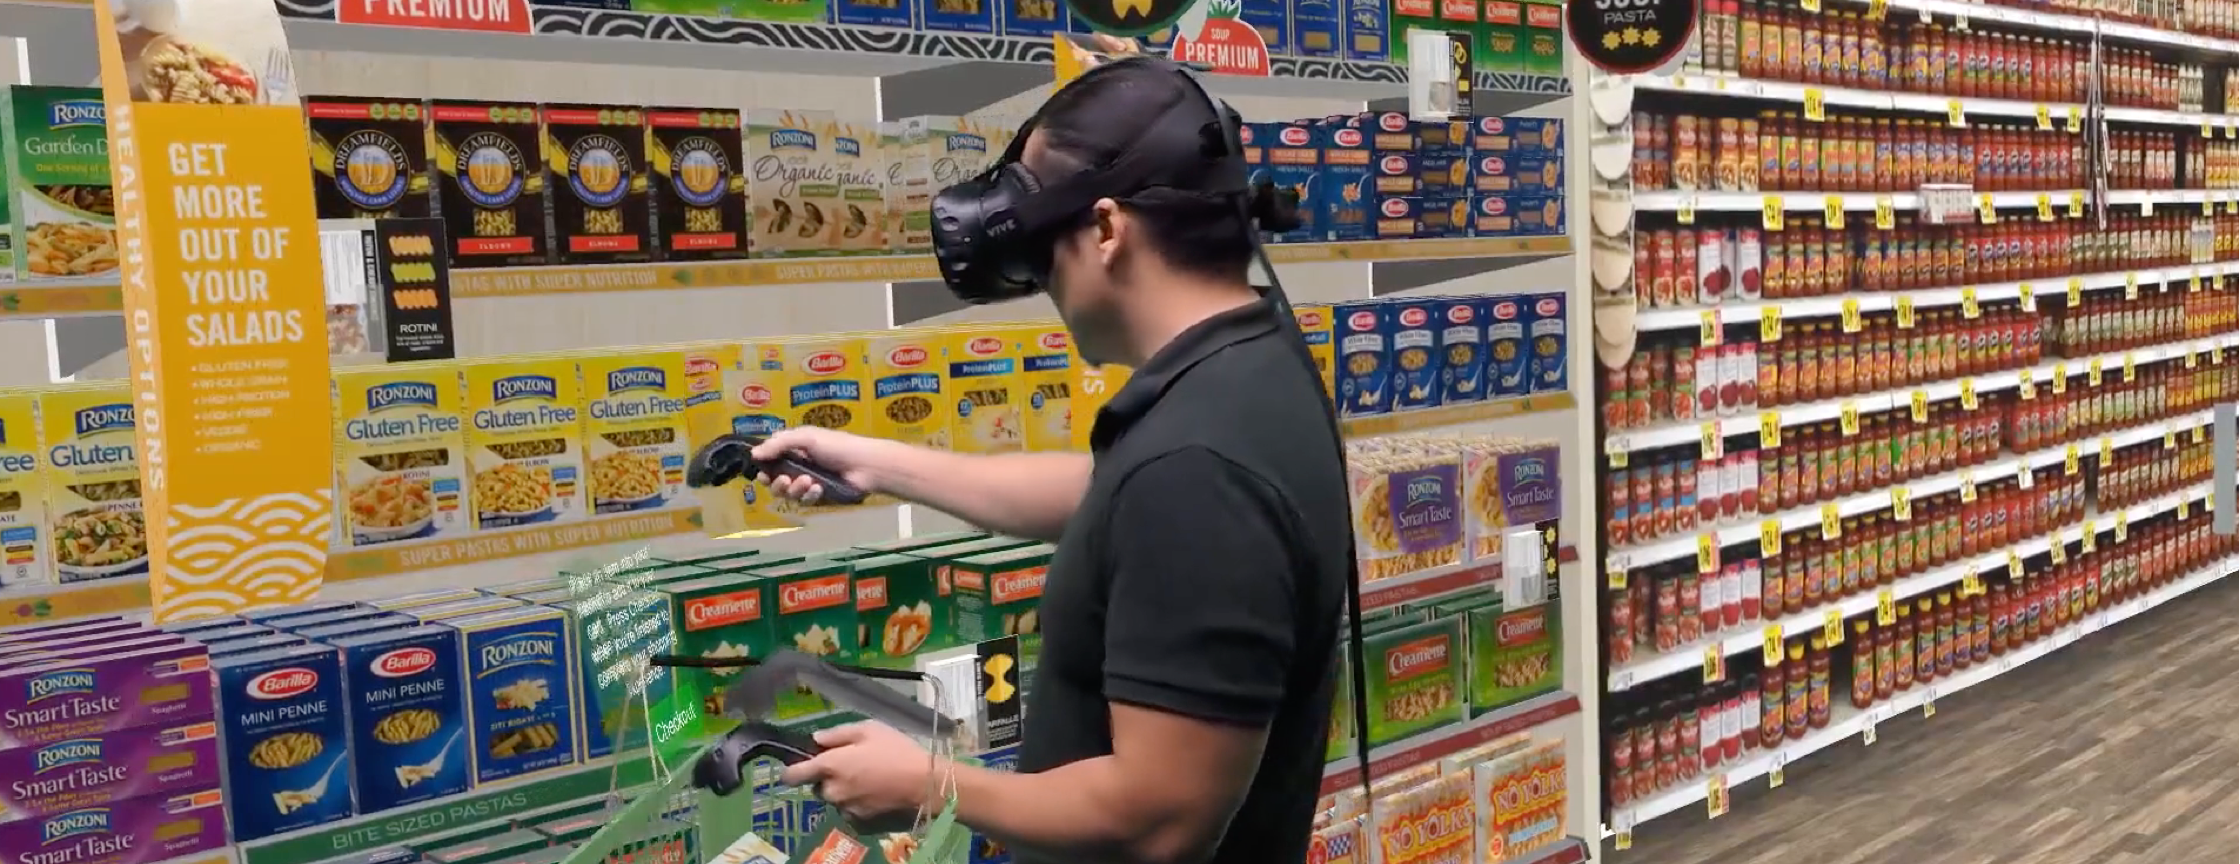
Planogramming products in the ReadySet VR retail environment

Photo: Planogramming in the VR environment

Eye tracking data output overlaid on VR retail environment

Photo: Eye tracking in the VR environment/Eye tracking data output

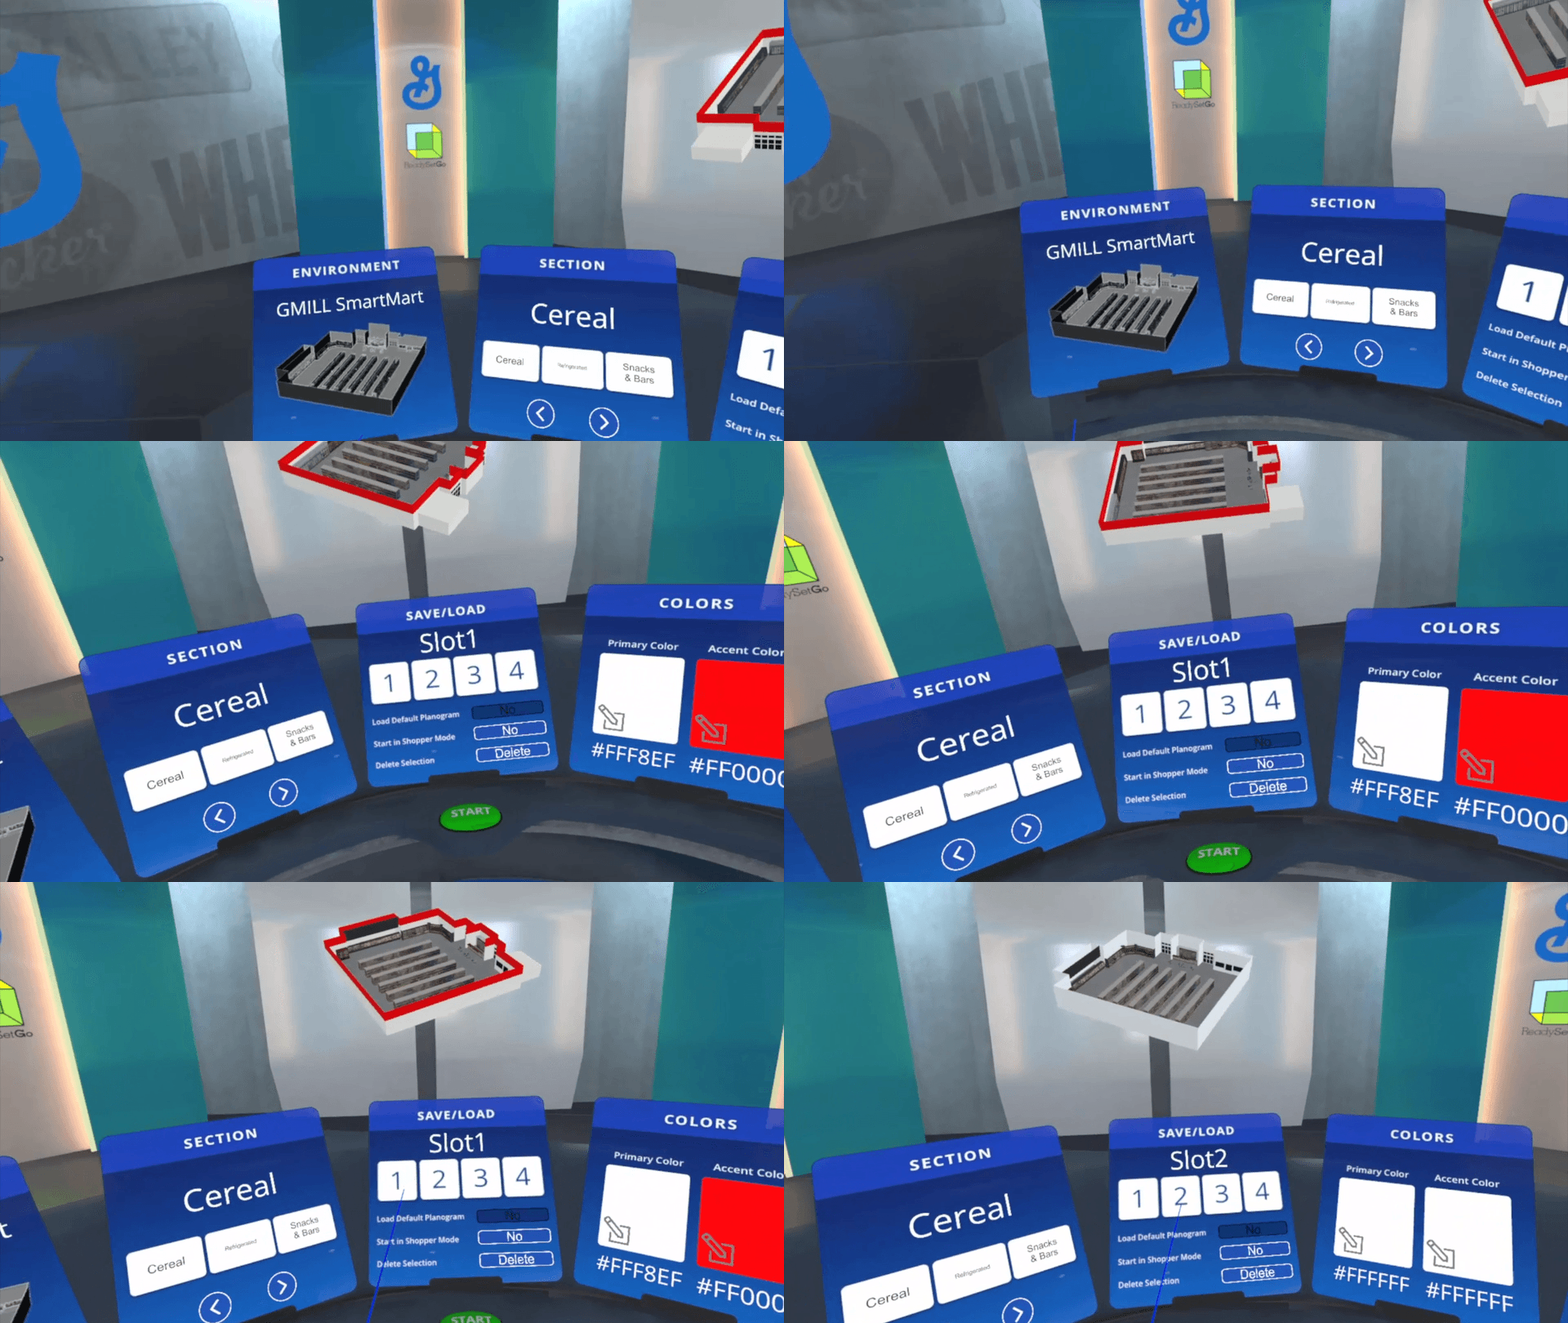
In addition to creating the core functionality of planogramming within a 3D environment, I designed an interface in which the retail environment could be configured, and settings could be adjusted.

The lead software developer and I conceived of a 3D environment that would act as a hub for the various settings and configuration, and I was responsible for the design. I created the interface in Sketch, and then worked with the 3D Modelers to complete the design of the environment.
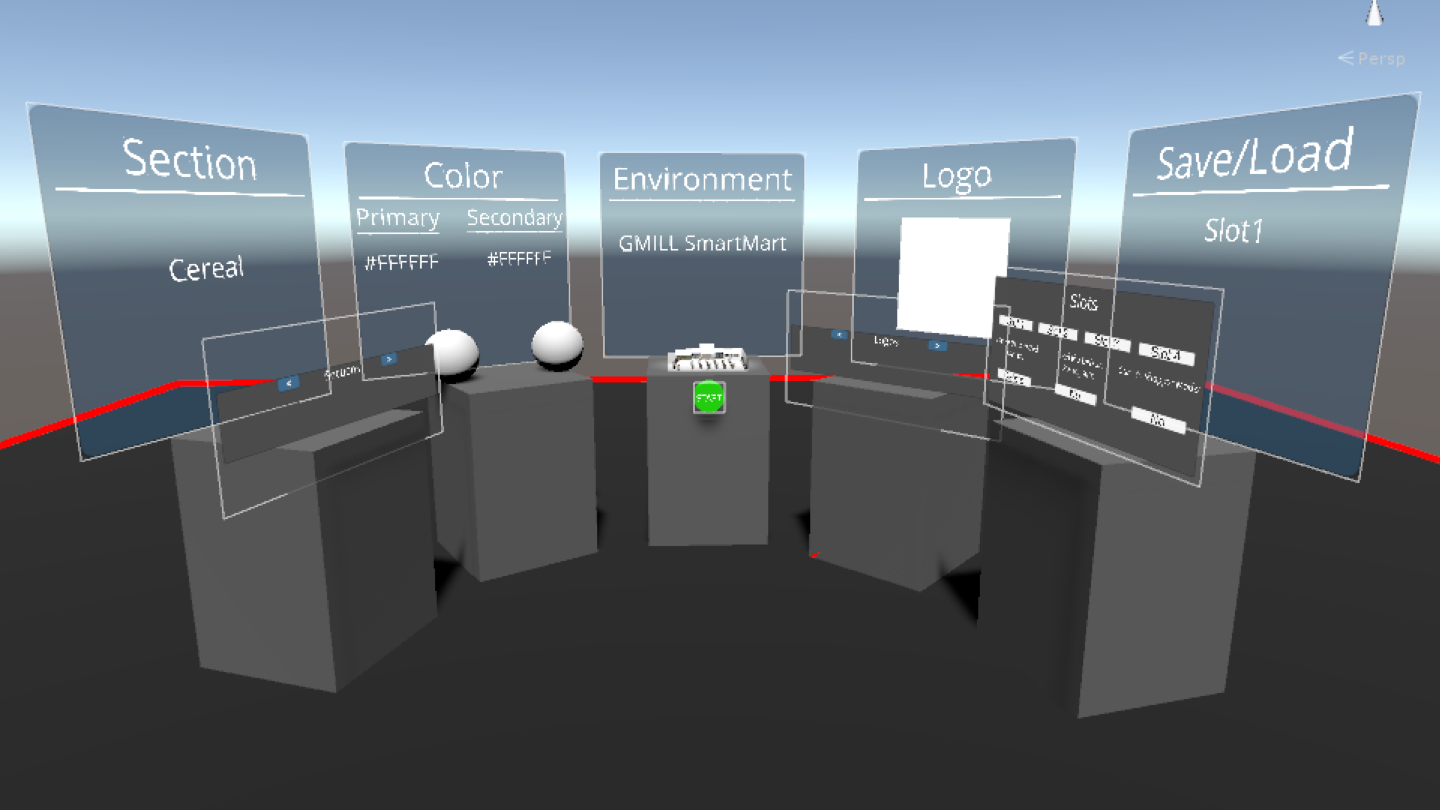
Low Fidelity prototype of Hub in VR environment
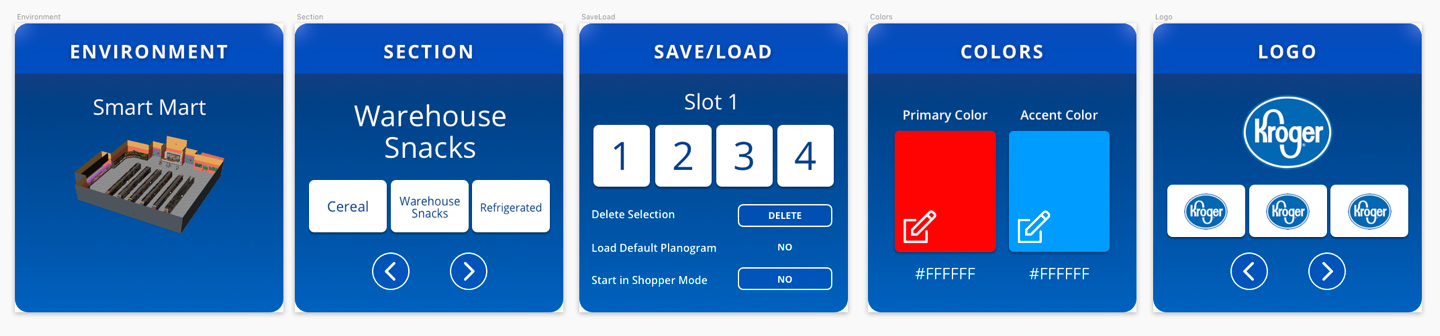
Photo: Low Fidelity prototype of Hub in VR environment

Hub UI desing in Sketch

Photo: Hub UI desing in Sketch

Hub in VR environment

Photo: Hub in VR environment

Usability and User Testing

With the core functionality for the hub and retail environments complete, I conducted usability testing to guarantee we were creating a solution that was as usable and intuitive as possible. I used coworkers as subjects because their different levels of experience in a VR environment provided me with a diverse sample group.
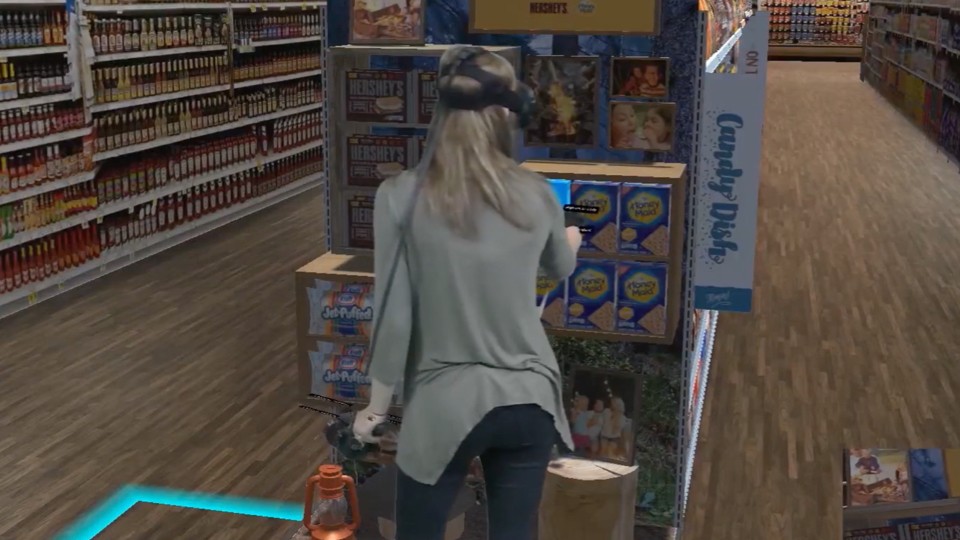
User testing in VR environment

Photo: User testing in VR environment
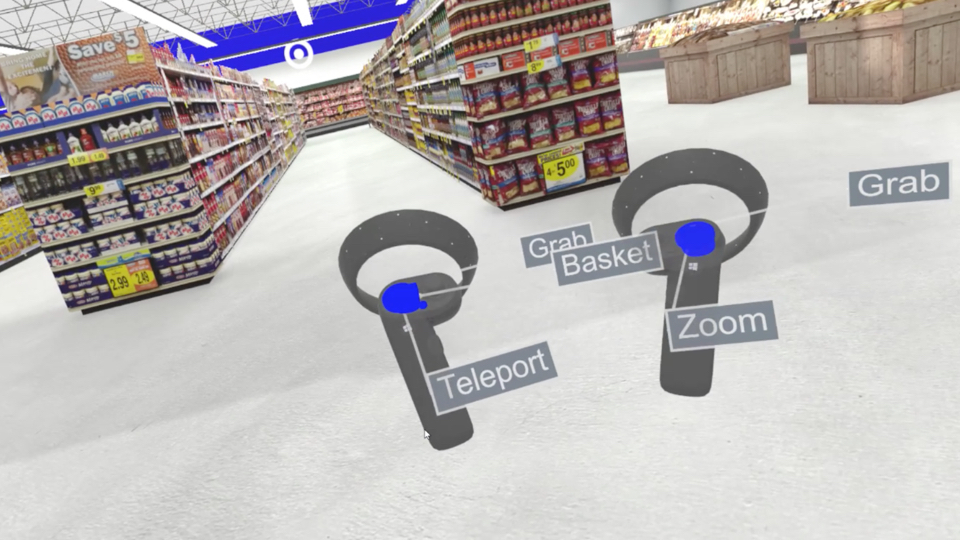
Labels on VR contorls

Photo: Labels on VR contorls

I found that regardless of experience with VR, there is a learning curve to using the controllers. The complexity of the program and VR environment led to a complicated set of controls, and users found it difficult to remember which buttons did what.

To help users, I recommended that we put labels on controllers within the VR environment, so it would be easier to learn and remember the controls.
usability testing with CPG technology managers

Photo: usability testing with CPG technology managers

I also conducted user and usability testing with technology managers from a consumer packaged goods company within the product's target market. These tests were essential to determining whether the product would meet user’s needs in the industry we were designing it for.

I received positive feedback on the flexibility of the 3D retail environment and planogramming, as the user found that it would be very helpful to their role. However, they found the VR hub environment cumbersome, time consuming, and confusing. They also suggested other features that would be useful to them, such as integration with existing software they were using.

Upon reviewing the test results, I determined the hub design for the settings and configuration would not be scalable, and was not the best option. I decided to develop a more appropriate solution.
Second Iteration

Referring to the feedback from the usability and user testing of the first iteration, I came to the conclusion that it was important to transfer functionality that didn’t require a 3D environment to a 2D interface. This would reduce time spent in the VR headset, which can be taxing on users, and help improve the scalability of the product, to allow more features to be added.

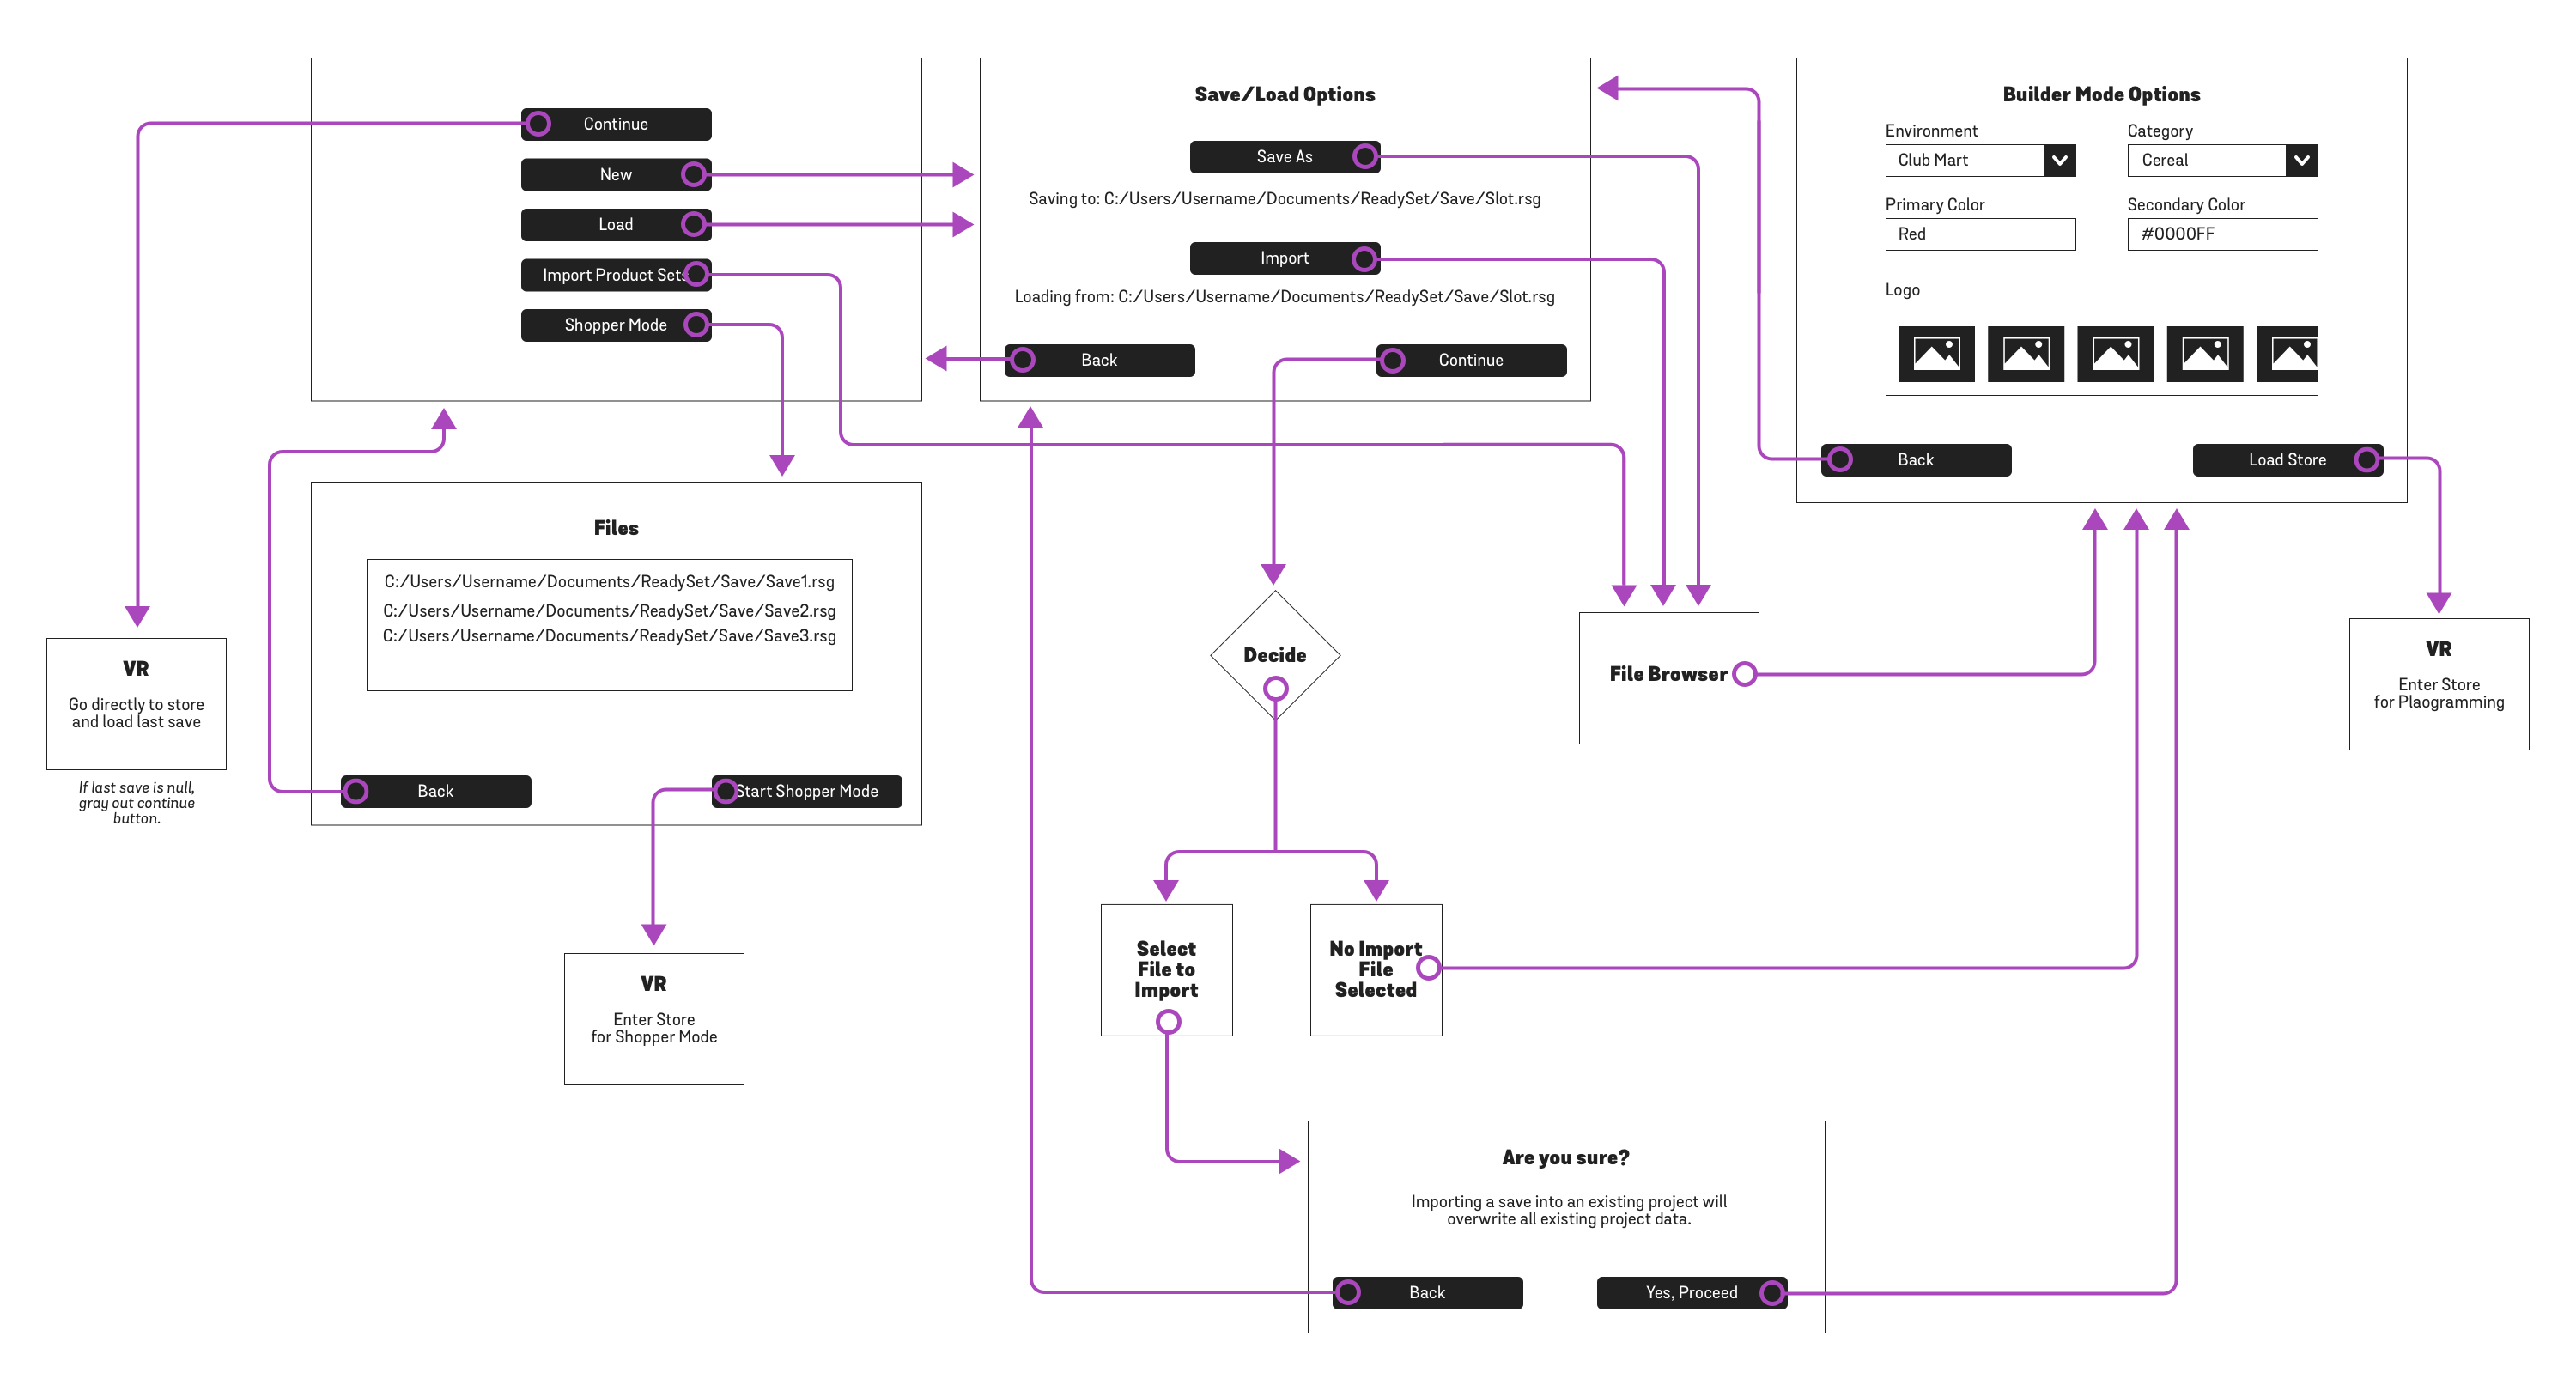
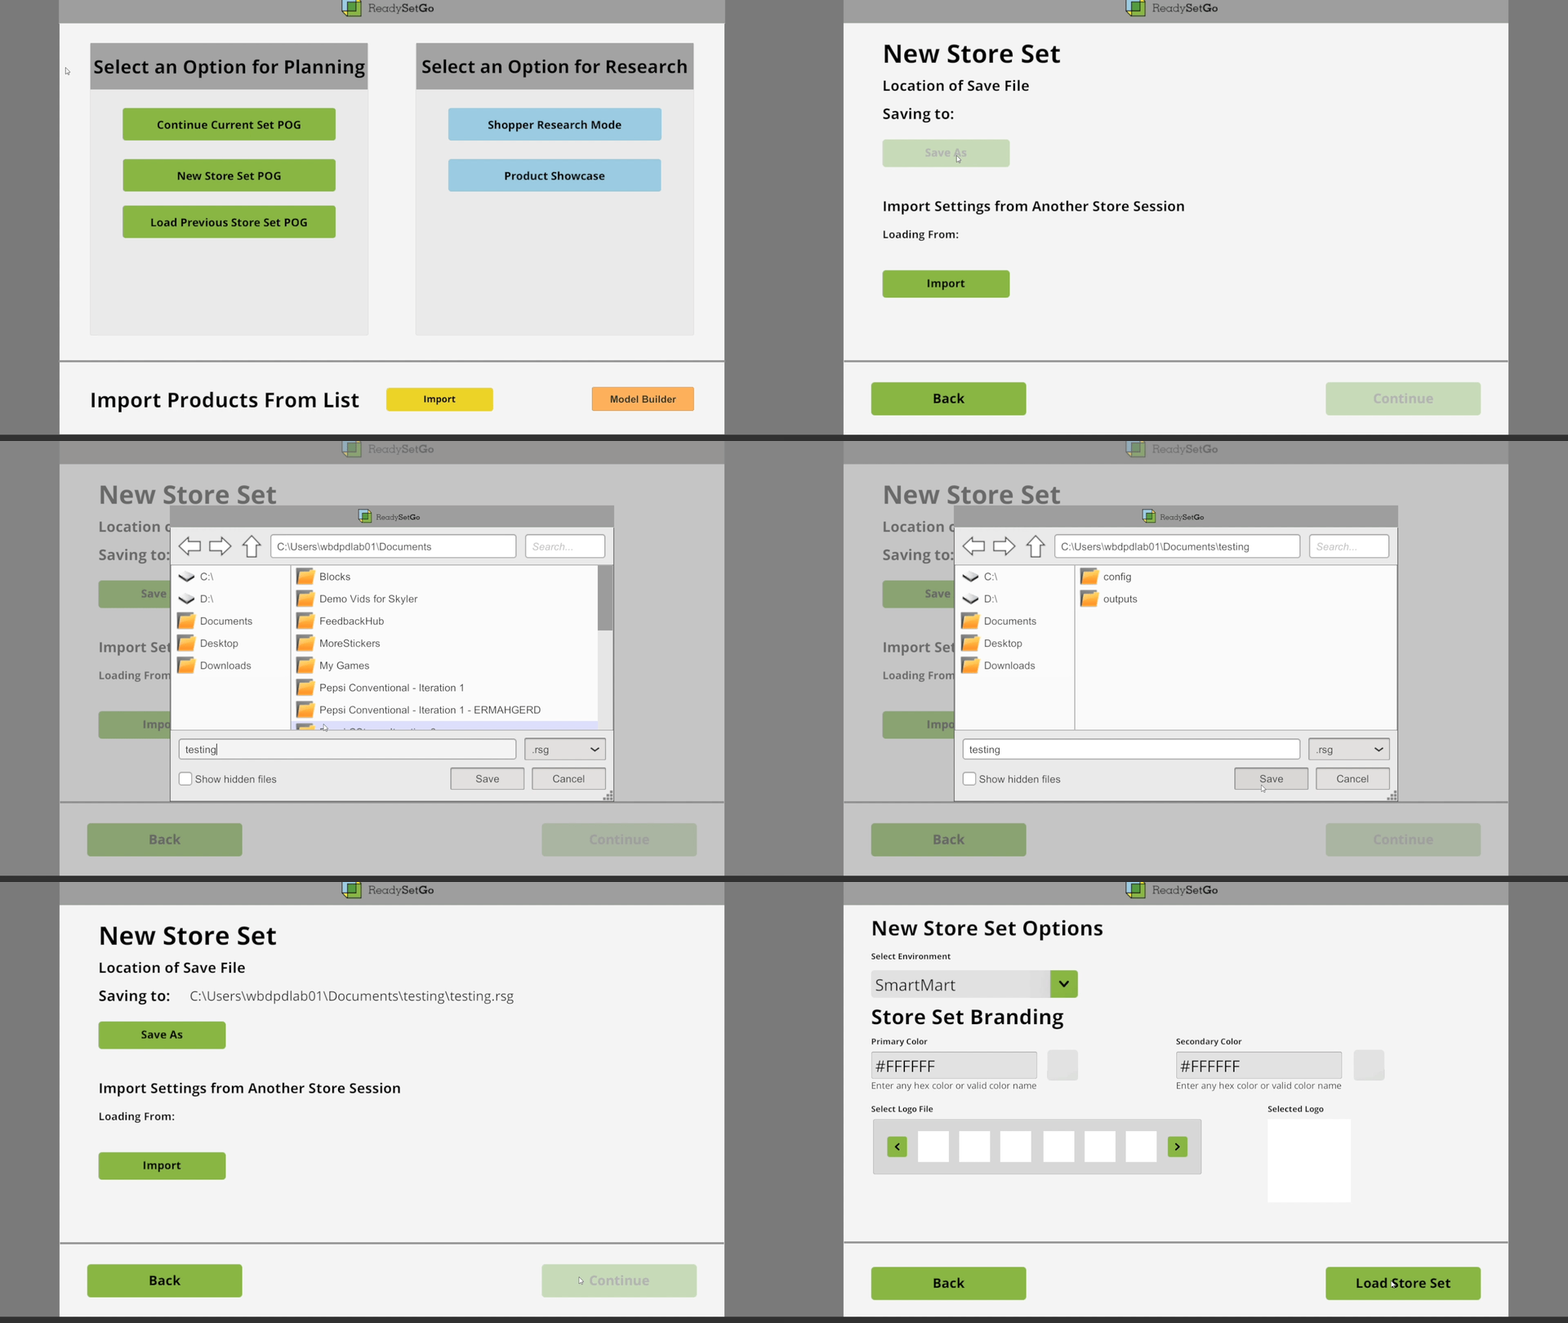
In order to translate the interface from the 3D VR environment to a 2D interface, I started by creating a wireflow. The wireflows combined wireframes of the 2D user interface with a simplified flowchart-like way of representing interactions. This allowed me to document the complex interactions that take place within the user interface, and determine the layout and static content.

Wireflow diagram

Wireflow diagram - zoom in

I presented the wireframe flowchart, along with the user feedback, to the software developers and the stakeholders. Upon review, they understood and approved the change.

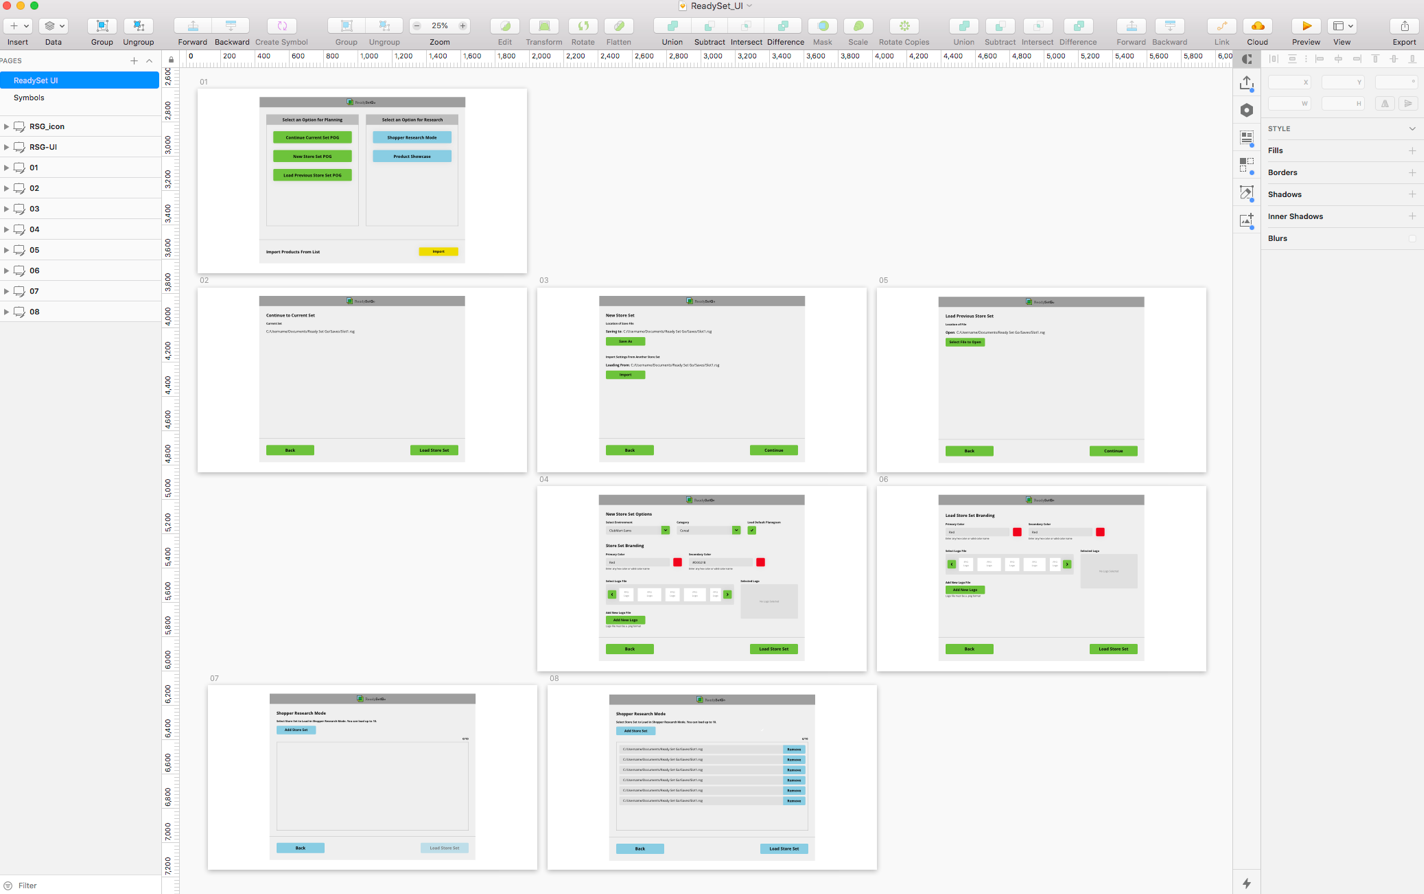
I then designed the 2D interface in sketch and passed the designs on to the developers for them to program.

ReadySet 2D UI design in Sketch

Photo: UI Design in Sketch

Usability and User Testing

I conducted usability and user testing with the same coworkers and CPG Technology Managers as the first iteration. This confirmed that the changes and additions we made would be usable and also meet needs within the industry.

User testing 2D UI

Photo: User testing 2D UI

I received positive feedback from users on having a portion of the interface moved into a 2D environment. Users liked that they were able to set up the environment and projects from their desktop instead of having to put on the VR headset. This encouraged collaboration and reduced the overall time they needed to wear the headset. Conversely, the found the design and functionality of the 2D interface modal windows hard to understand.

The users also wanted to be able to see what the environment looked like while they were making changes. Being unable to see the configuration of the retail the environment they were setting up contributed to their confusion.

MVP Iteration

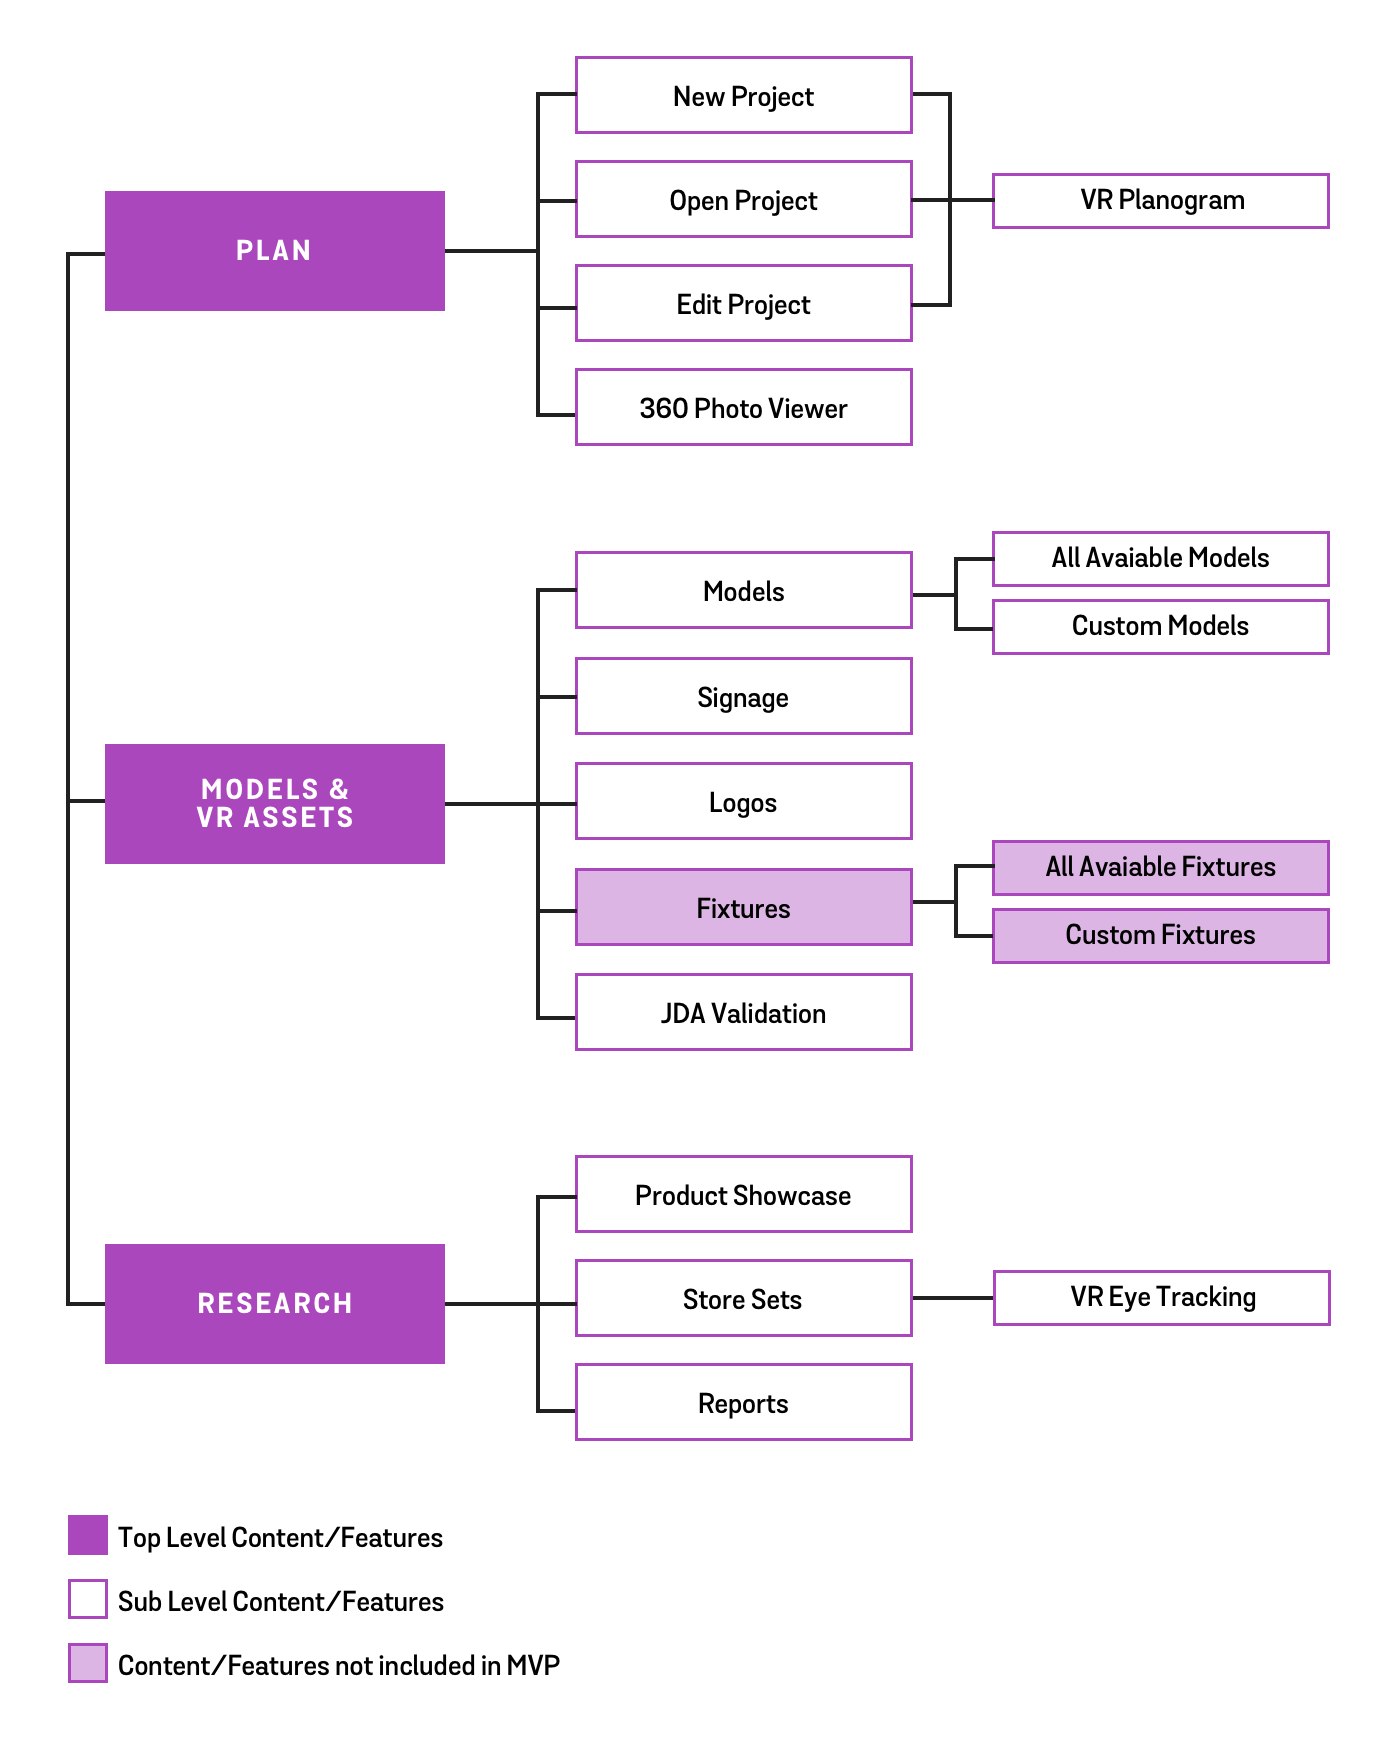
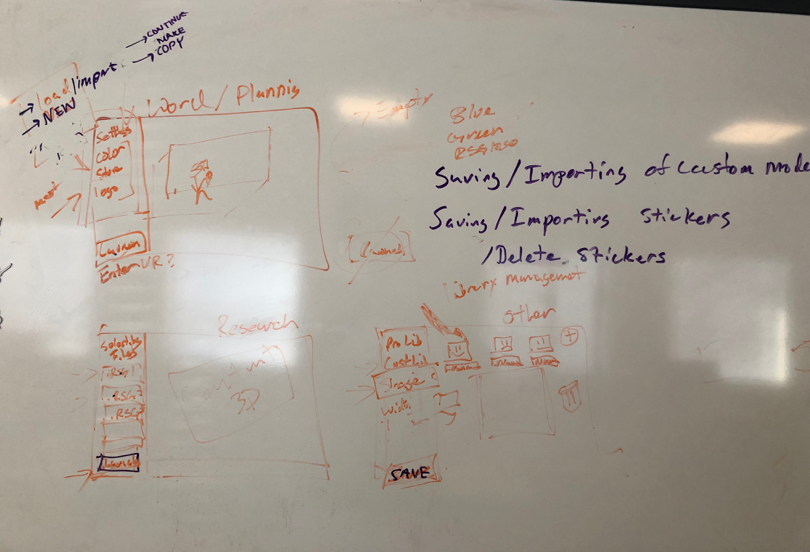
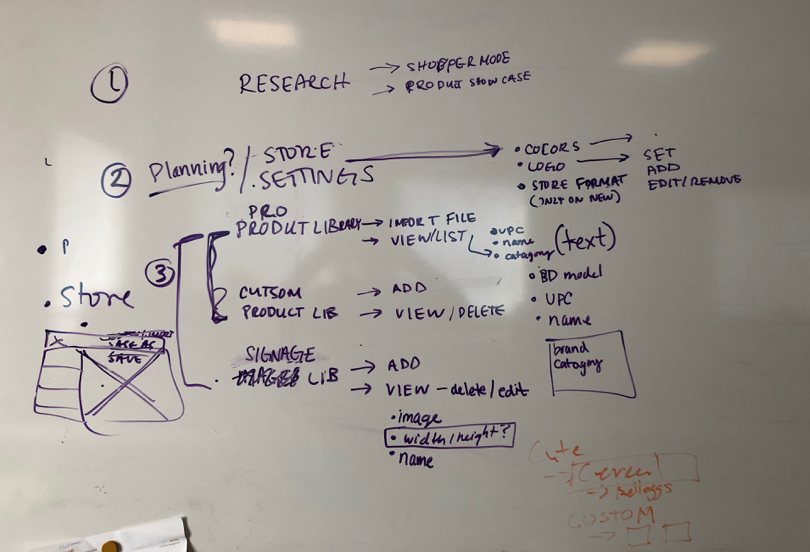
I reworked the 2D interface based on the feedback from the user and usability testing of the second iteration. I spent time sketching out versions of the interface that would allow users to visualize the 3D VR environment as they were configuring it. To help me visualize the arrangement and labeling of content and functions and to define a hierarchy I created a sitemap.

Sitemap Diagram

Sitemap Diagram - Zoom In
Whiteboard sketching

Photo: Whiteboard sketching

Whiteboard sketching

Photo: Whiteboard sketching

I presented my sketches and ideas to the software developers. They approved of the direction I was taking and we solidified the ideas and design with more whiteboard. Then, I mocked-up the interface in sketch so it could be passed on the developers.

UI in Sketch

Photo: UI in Sketch

Based on previous feedback, I also had to design additional functionality into the interface to complete the design of the MVP interface.

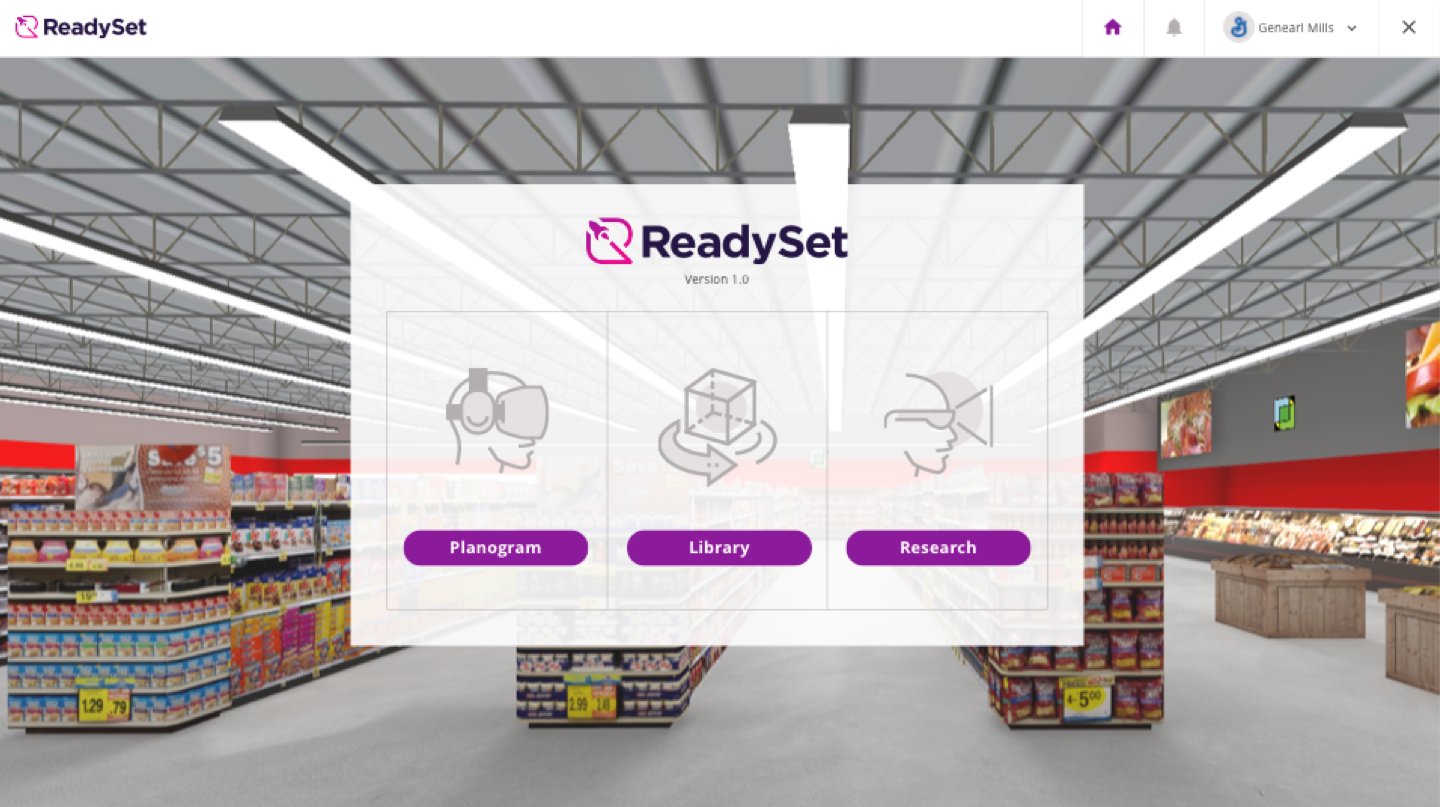
While working on the entirety of the interface design, I incorporated the visual branding, developed by a visual designer, into the interface.

UI with ReadySet bradning

Photo: UI with ReadySet bradning

Usability and User Testing

I again conducted usability and user testing with the same coworkers and CPG Technology Managers as participants. This final testing was used to guarantee the MVP product was usable and would be viewed as a desirable product within the industry.

User testing MVP

Photo: User testing MVP

User testing MVP

Photo: User testing MVP

Overall, users had a positive reaction to the changes to the user interface and the additional features that were added to the product. They loved being able to view the environments and the changes they were making to them before they were launched in the VR headset. During User Testing, users found that the product would help them achieve their goals.

The product design was approved by the stakeholders based on the positive user feedback, and the MVP version was ready to be launched.

Solution

As a single, integrated platform, ReadySet accelerates the retail innovation process. It enables its users to plan, test and take solutions to market in a fraction of the time and at a fraction of the cost.

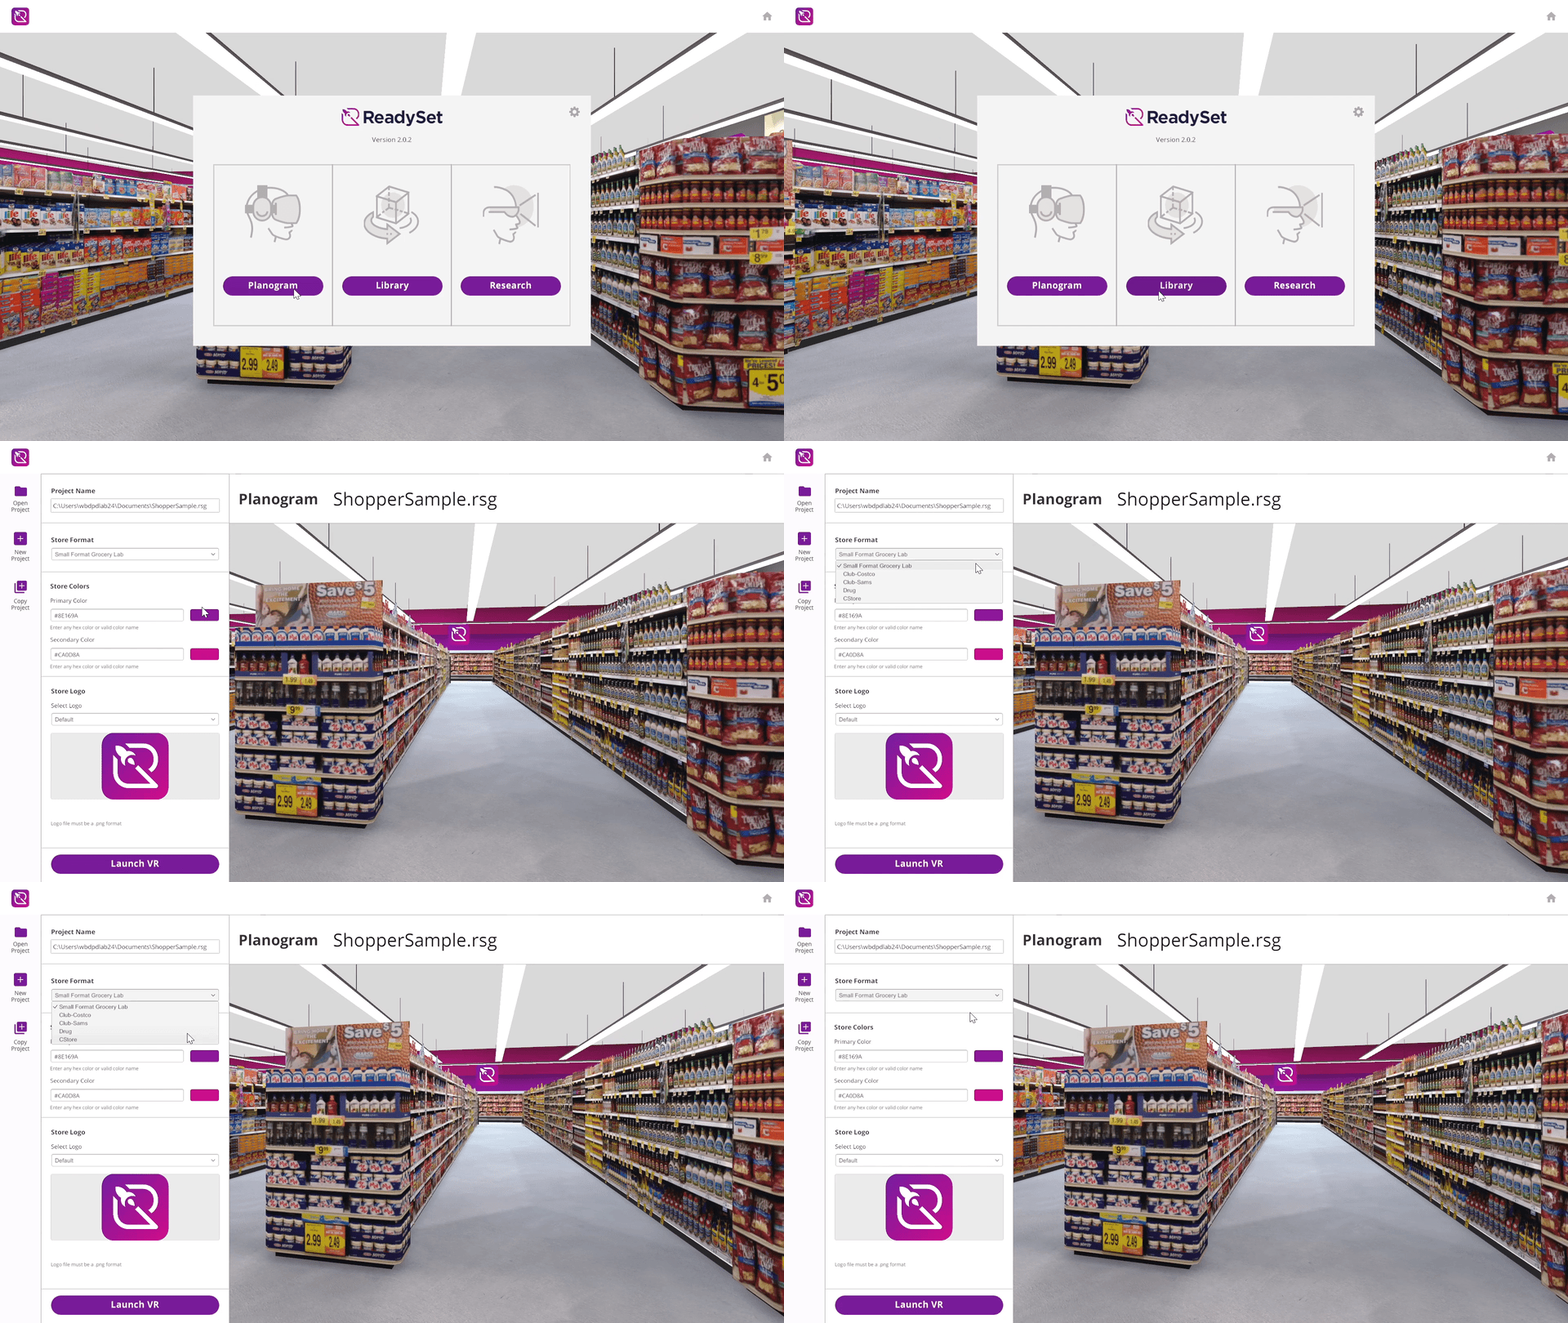
ReadySet UI store environments

Store Environments

  • Customize store environments
  • Change the store color, logos and signage
ReadySet UI planogramming

Planogramming

  • Build and optimize custom, iterative planograms
  • Import existing JDA plaograms
  • Active/deactive sections for planogramming
  • Active presentation view for real time team collaboration
  • Add, remove and move shelves with ease
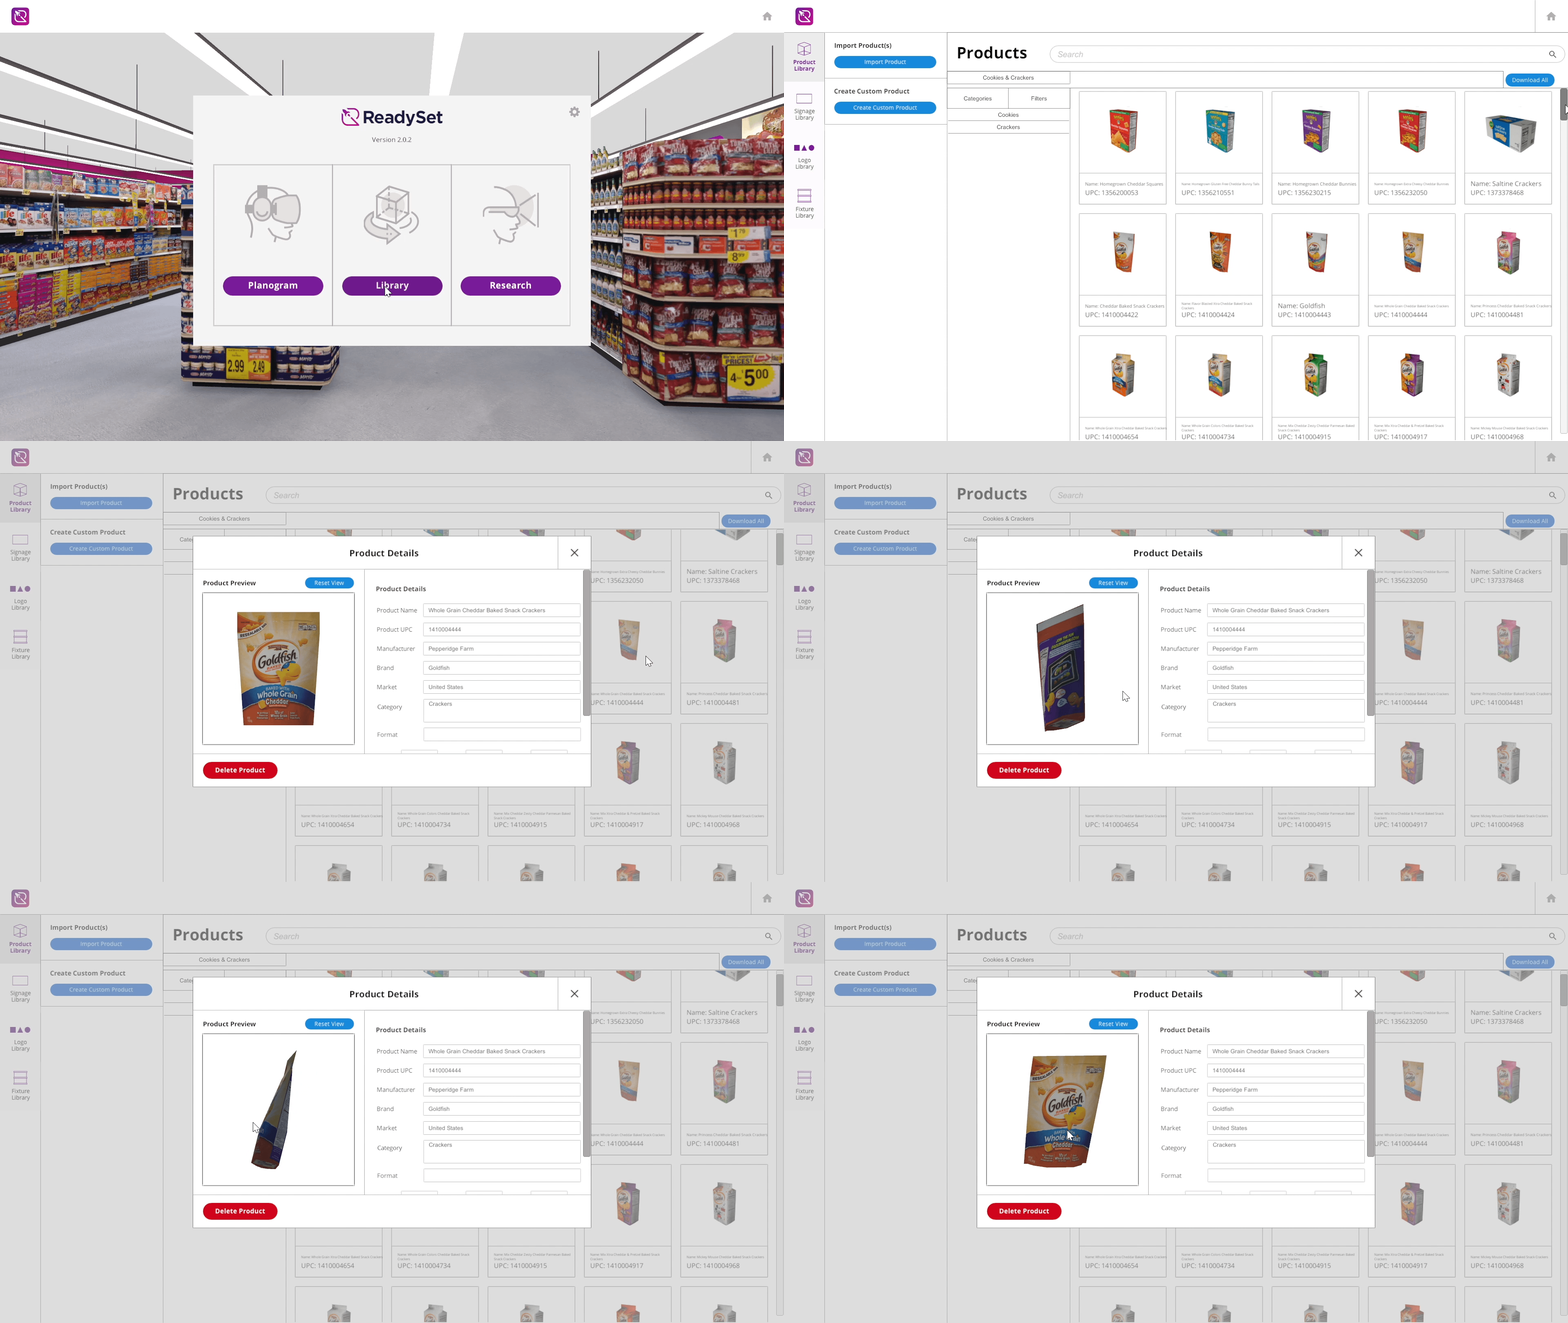
ReadySet UI product models

Product Models

  • Access your fully modeled 3D prodcuts from the model library
  • Place, backfill and stack prodcuts
  • Move freely around the store environment
  • Move vertically to add overhead signage to your environment
  • Save your RSG project or export as JDA
  • Create 2D and 360 degree screenshots to share and distribute
ReadySet UI Research & Analytics

Research & Analytics

  • Preform respondent testing in a life-size whole store environment
  • Easily test your optimized, iterative planograms with shoppers
  • Fully immersive shoppipng interactivity
  • First person perspetive or presentation view
  • Track shopper behavior
  • Gain insights with eye tracking reporting, coupled with data outputs
  • Easily composite shopper respondent metrics

Conclusion

The MVP was successfully launched within the 6 month timeframe. Shortly after launch, it was purchased and adopted by two enterprise level clients, General Mill and The Hershey’s Company.

View the ReadySet website

Next Steps

  • More Features
    There are many more features that are planned to be added to the product. These features will be prioritized and implemented moving forward.
  • Test & Iterate
    As more organizations adopt the software, the testing and iterating the software will not end.
  • Integration with Internal Workflows
    To facilitate an expedited workflow with the internal 3D modeling and business support teams, a companion web app will be developed and created to handle customer support, customer relationship management (CRM), and modeling requests.

Project Insights

  • Process is essential
    For a project that is vast and ambiguous, like this one, it can be difficult to navigate. If you rely on the process as the path, it will lead you on your way to a solution.
  • Collaboration is key
    The more eyes there are on a design, and the more it’s exposed to varying opinions, experience, and critique, the better it gets.
  • Show, don’t just tell
    The best way to convince someone is to show them something, and not just tell them. Using visuals, data, and user feedback helps.